

Blog Category
 Mobile App Testing(45)
 Web App Testing(38)
 Game Testing(22)
 Automation Testing(31)
 Security Testing(18)
 Performance Testing(15)
 Selenium(12)
 Test Management(10)
 Usability Testing(9)
 Guides and Tutorials(20)
 Best Practices(14)
 Expert Insights(8)
Software Testing Events(5)
 Software Testing Events
Our Services
 Load Testing
 Performance Testing
 Hire a Tester
Selenium IDE Tutorial For Beginners
June 22nd, 2023
Welcome to a fascinating journey into the Selenium IDE world, aspirant testers and tech enthusiasts.
This tutorial is your key to mastering Selenium IDE's amazing features, whether you're a novice eager to delve into the world of automated testing or a seasoned professional looking to improve your skills.
Prepare for an exciting journey as we uncover this tool's secrets and give you the knowledge and abilities to write reliable, effective test automation scripts. So prepare for an insightful Selenium IDE tutorial that will elevate your testing game by grabbing your virtual testing lab coat and donning your coding glasses.
 Selenium is a widely used automation testing tool and offers extensive features. Some of the common features of Selenium IDE are:
 3) You will get a popup asking for your permission to install Selenium IDE Add-ons or not. Click the Install button over the popup.
 4) Firefox will then install Selenium IDE software and you will get a popup asking you to restart the Firefox. Click the restart button. The Selenium installation will now be reflected on your browser.
5) After you restart you ur browser you can find the selenium IDE under the tools menu list present at the top bar
4) Firefox will then install Selenium IDE software and you will get a popup asking you to restart the Firefox. Click the restart button. The Selenium installation will now be reflected on your browser.
5) After you restart you ur browser you can find the selenium IDE under the tools menu list present at the top bar
 6) Click on selenium ide your selenium ide will launch
 Edit Menu
 helps to Cut Copy Paste and Insert Command in Selenium IDE Test. You can open the Edit menu by pressing Alt + E, or by clicking on the Edit menu.
Under the Edit menu you can find:
Edit Menu
Edit Menu helps to Cut Copy Paste and Insert Command in Selenium IDE Test. You can open the Edit menu by pressing Alt + E, or by clicking on the Edit menu.
Under the Edit menu you can find:
 It is the place where Test Case Steps are recorded. All the user actions are recorded in the order they are performed. It also allows the editing and changing of the test cases
Output Pane
The bottom pane or the Log Pane offers the following functions
It is the place where Test Case Steps are recorded. All the user actions are recorded in the order they are performed. It also allows the editing and changing of the test cases
Output Pane
The bottom pane or the Log Pane offers the following functions
 Selenium commands or Selenese are a set of test cases that are deployed to test web applications using Selenium.
Selenium commands are of three types:
Actions
Actions commands control the state of the application. Operations under action commands are:
Selenium commands or Selenese are a set of test cases that are deployed to test web applications using Selenium.
Selenium commands are of three types:
Actions
Actions commands control the state of the application. Operations under action commands are:
 Locators tell on which GUI elements do Selenium IDE needs to operate on. The correct identification of the locators is very important and it is equally challenging.
There are many commands in Selenium IDE that do not require Locators, but most of the commands do require locators. The locators to be used depends on the AUT.
The various types of locator are:
Locator: ID
It is a common way to locate different elements as every element has a unique ID.
Target Format: id=id of the element
Consider any test app, let it be Facebook.
Locators tell on which GUI elements do Selenium IDE needs to operate on. The correct identification of the locators is very important and it is equally challenging.
There are many commands in Selenium IDE that do not require Locators, but most of the commands do require locators. The locators to be used depends on the AUT.
The various types of locator are:
Locator: ID
It is a common way to locate different elements as every element has a unique ID.
Target Format: id=id of the element
Consider any test app, let it be Facebook.
 Locator: Link
This locator is used for hyperlink texts. It can be used by beginning the target with "link=" tailed by hyperlink text.
Target Format: link=link_text
Consider any web app as a text app.
Locator: Link
This locator is used for hyperlink texts. It can be used by beginning the target with "link=" tailed by hyperlink text.
Target Format: link=link_text
Consider any web app as a text app.
The Document Object Model is an HTML document that can be accessed using JavaScript. It uses hierarchical dotted notation to locate an element on the page.
If you wish to learn more about selenium we have comprised a tutorial just for you which will take you deep into the tool.
Latest News About Selenium IDE
Selenium IDE encountered a fork in its journey when Firefox's unfortunate withdrawal of support presented itself. A brand-new Selenium IDE that is independent of any particular browser was developed as a result of the quick response of the committed Selenium community to the challenge. This updated Selenium IDE, developed as a web extension, offers a plethora of improvements and features that address the changing requirements of automated testing. The new Selenium IDE, which embraces a cross-browser approach, supports popular browsers like Chrome and Firefox, giving testers the ability to seamlessly run their automated tests across various platforms. The new Selenium IDE features a new and dynamic interface with enhanced recording capabilities, advanced debugging tools, and comprehensive test reports that continue to streamline the test automation process for both novices and experts. +This tenacious transformation proves the Selenium community's unwavering dedication to offering an exceptional testing experience and guarantees that Selenium IDE continues to flourish even in the face of shifting technological environments.Features of the New IDE
Cross-Browser Compatibility: By supporting popular web browsers like Chrome and Firefox, the new Selenium IDE enables testers to create and run tests on various platforms. Improved Recording and Playback: Testers can easily record and automate their interactions with web applications thanks to improved recording capabilities. The playback feature makes sure that tests go off without a hitch and consistently. Intelligent Element Locators: The IDE offers intelligent locators that adjust to changes in the application's structure, simplifying test maintenance and lowering the demand for ongoing updates. Strong Debugging Tools: With features like breakpoints, step-by-step execution, and variable inspection, debugging is made simple. The root causes of failures can be found and efficiently resolved by testers. Test Data Management: The IDE provides a range of adaptable options for handling test data, such as data-driven testing, which enables testers to run the same test against various datasets. Customizable: Selenium IDE can be customized and extended using plugins and custom scripts, allowing testers to improve its functionality in accordance with their unique needs. Test reporting and metrics: The IDE generates thorough reports that include specific information about test results, such as pass/fail status, execution time, and screenshots. These reports help identify areas that need more attention and offer insightful information about test coverage. Collaboration and Knowledge Sharing: Test scripts are easily shared and worked on by teams, encouraging productive teamwork and knowledge exchange. Integration with Selenium Grid: Thanks to the new Selenium IDE's seamless integration with Selenium Grid, testers can distribute tests across multiple machines and run them concurrently, greatly cutting down on the time it takes to complete a test. Support for Continuous Integration (CI): The IDE easily integrates with well-known CI/CD tools, giving testers the ability to incorporate automated tests into their development workflows and achieve continuous testing.About Selenium IDE
Selenium integrated development environment that is plugged into Firefox. It is an automation testing tool that is very simple, easy and user-friendly. It offers easy installation, learning, and creation of test scripts. Selenium IDE is based on record and playback principle. It is good for all kinds of testing. Features of Selenium IDE That Makes it the Best!
Selenium is a widely used automation testing tool and offers extensive features. Some of the common features of Selenium IDE are:
- It offers an easy and simple record and playback features
- Supports Intelligent field selection
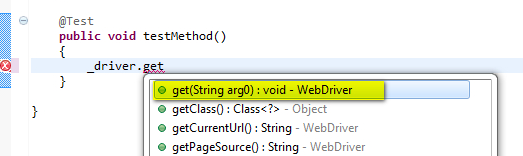
- Auto-completion of Selenium commands
- Walkthrough tests
- Easy Debugging capabilities
- Easy setting of breakpoints
- Save tests as HTML, Ruby, Python, C# scripts, or any other format
- Supports Selenium user-extensions.js
- Supports automatic assertion of title for all pages
- Supports easy customization
- Does not require programming skills
The Drawback of Selenium IDE
Selenium IDE is a Firefox plug-in hence it supports only Firefox and the test scripts Created in Selenium IDE can only be executed in the Firefox browser.Step-by-Step Tutorial about learning Selenium IDE
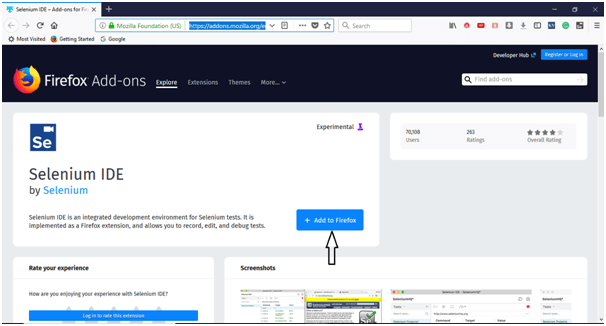
Downloading and Installing Selenium IDE Now when we have a good idea on what is Selenium IDE, let us move to the next step of Downloading and Installing Selenium IDE. To download Selenium IDE you need to have Mozilla Firefox, if you have it well and good if you don’t have it, download it. Steps to download and install Selenium IDE 1) Launch Mozilla Firefox Browser. 2) Open Selenium IDE Add-ons page by typing URL: https://addons.mozilla.org/en-us/firefox/addon/selenium-ide/ in your browser. Next Click on Add to Firefox button.
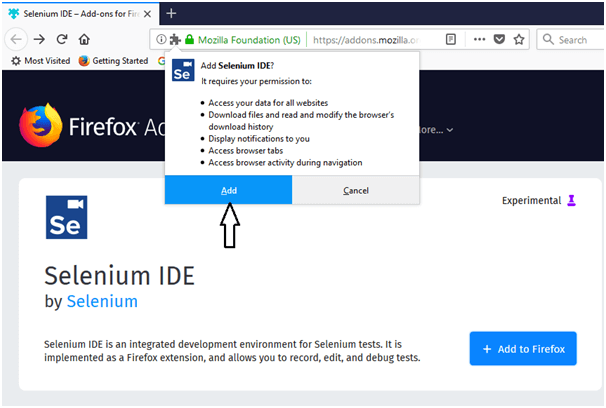
3) You will get a popup asking for your permission to install Selenium IDE Add-ons or not. Click the Install button over the popup.
4) Firefox will then install Selenium IDE software and you will get a popup asking you to restart the Firefox. Click the restart button. The Selenium installation will now be reflected on your browser.
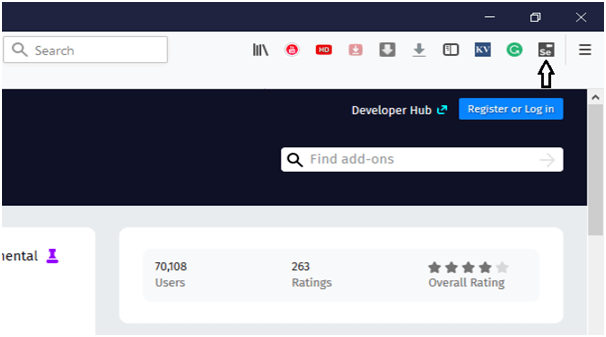
5) After you restart you ur browser you can find the selenium IDE under the tools menu list present at the top bar
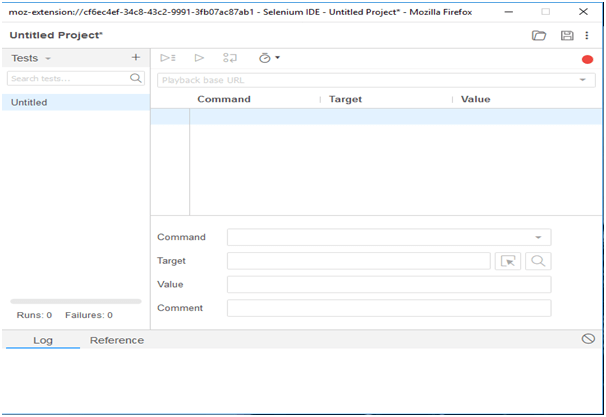
6) Click on selenium ide your selenium ide will launch
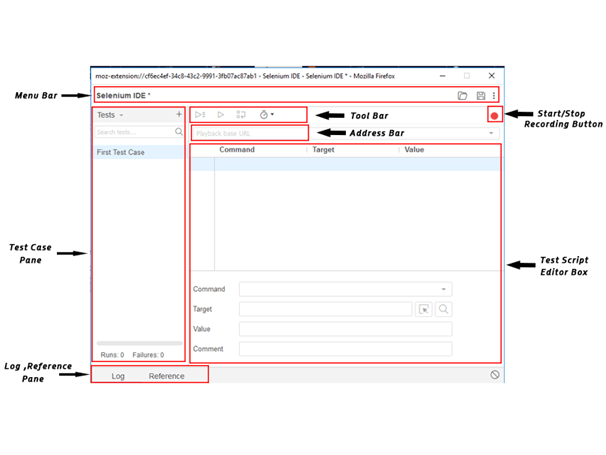
Sections of Selenium IDE
Selenium IDE is divided into different sections. Before start working on it, you must know about these categories: Menu Bar present at the uppermost of the Selenium IDE window. The menu bar consists of five sub-modules. File Menu File Menu Create, Save and Export Test Case and Test Suite of Selenium IDE. You can open the file menu by pressing Alt + F, or by clicking on the File menu. Under File menu you can find:- New Test Case: It creates a new blank Test Case
- Open: It Open already saved Test Cases.
- Save Test Case: Saves the opened Test case.
- Save Test Case As: Saves opened Test Case in a specific location and has a specific name.
- Export Test Case As: Assists exporting test cases in various languages like Ruby/Python/Java/C# in both Selenium Remote Control and Selenium WebDriver Format.
- Recent Test Cases: Returns a list of few last saved Test Cases.
- Add Test Case: Search test cases and merge them into the currently opened test case.
- Properties: returns the properties opened test case.
- New Test Suite: creates a blank Test Suite
- Open Test Suite: Opens existing Test Suite.
- Save Test Suite: Saves opened Test Suite.
- Save Test Suite As: Saves opened Test Suite in a specific location and has a specific name.
- Export Test Suite As: Assists exporting test Suite in various languages like Ruby/Python/Java/C# in both Selenium Remote Control and Selenium WebDriver Format.
- Recent Test Suites: Returns a list of few last saved Test Suite.
Edit Menu
Edit Menu helps to Cut Copy Paste and Insert Command in Selenium IDE Test. You can open the Edit menu by pressing Alt + E, or by clicking on the Edit menu.
Under the Edit menu you can find:
- Undo: last action or few last performed actions are undone
- Redo: Re-do the last undone action or series of last undone actions.
- Cut: Copies and removes the selected command or test step from the current location to some other location in the test.
- Copy: Copies selected command or test step from current location to some other location in the test. But it does not remove the command from the previous locations.
- Paste: Pastes cut/copied command to a selected location in the test.
- Delete: Deletes the chosen command.
- Select All: Select all the commands in Test Step Pane.
- Insert New Command: Insert a row at a selected location to write new commands
- Insert New Comment: Insert a row at a selected location to write a new comment
Read also: Selenium 4: New Features and Updates
Actions Menu Helps us to learn Options to Record Play Run And Debug Selenium IDE Test.- Record: It Records the user actions on the webpage via the Firefox Web Browser. While recording, the menu item keeps displaying a chack against items.
- Play Entire test suite: it play-back/re-run every Test Case in the Test Case Pane, following top to bottom approach.
- Play the current test case: play-back the selected Test Case.
- Playtest Suites periodically: let the specified test suite to execute at specific times. It is the best way when test suits are required to be rerun periodically as it does not require any human intervention, once specified it will rerun test cases automatically
- Toggle Breakpoint: allows you to specify one or more breakpoint(s) to forcefully break the execution at specified steps.
- Set / Clear Start Point: it permits the testers to select a start point to start executing the test. It is important for subsequent runs.
- Pause / Resume: this enables the pausing and resuming of the test at any point between the test execution.
- Step: it permits to step through the playing-back of the test case. It is important for debugging purposes.
- Execute this command: This allows testers to execute a particular command instead of executing the complete test case. It is important when testers want to see the behavior of any specific command
- Fastest/Faster/Slower/Slowest: it allows you to set the execution speed from fastest to lowest concerning the responsiveness of the application under test.
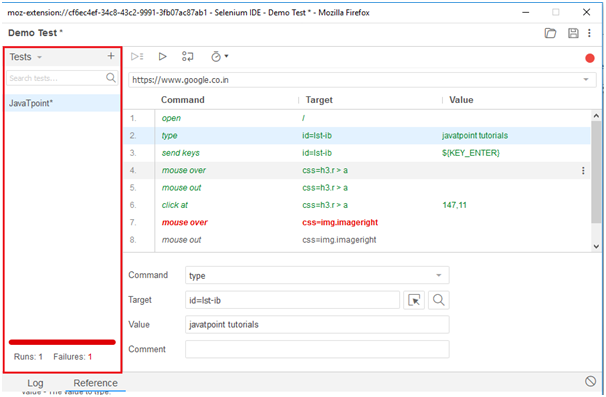
It is the place where Test Case Steps are recorded. All the user actions are recorded in the order they are performed. It also allows the editing and changing of the test cases
Output Pane
The bottom pane or the Log Pane offers the following functions
- Log,
- Reference,
- UI-Element, and
- Rollup
- Launch Firefox Selenium IDE. Type the URL. Click the Record button, a red button on the top right corner. It will record Test Cases.
- In Firefox, type the same URL as in step 1. Firefox will take you to the related webpage.
- Right-click anywhere on this page, you will get Selenium IDE context menu. In the context menu go to Show Available Commands> Web Page Name.
- Click on MyAccount
- Enter UserName and Password and then click on the login button.
- To stop the recording click the record button again. Click on the Table tab and you will be able to see the recorded commands.
- Click on the Source tab to see HTML Code.
Read also: 11 Awesome Selenium Alternatives For Testers in 2019
Save the Selenium IDE Test Case.- To save a test case go to File Menu and click on Save Test Case As.
- Choose the desired location and give your file a name and click on Save.
- You can see the name of the saved test case on the left-hand side.
- The file will be saved as HTML.
Selenium commands or Selenese are a set of test cases that are deployed to test web applications using Selenium.
Selenium commands are of three types:
Actions
Actions commands control the state of the application. Operations under action commands are:
- type this box,
- click this link
- select option.
- Assert:
- Verify:
- WaitFor:
- type: Set the value of the input field
- open: Opens a web page through the given URL.
- click clicks on a checkbox, link, button or radio button.
- clickAndWait: When you click on the checkbox, link, button or radio button, and a new page is loaded it calls waitForPageToLoad.
- select: It selects an option drop-down.
- selectFrame: It is used to select a frame from the present window.
- verify title/assert title: Authenticates an anticipated page title.
- verifyElementPresent: Confirms if the
- indicated element is present on the page.
- highlight: Altersthe backgroundColor of the indicated element.
- pause: Wait for the indicated time period
- echo: Prints indicated message in your Selenium command tables.
Locators in selenium IDE
Locators tell on which GUI elements do Selenium IDE needs to operate on. The correct identification of the locators is very important and it is equally challenging.
There are many commands in Selenium IDE that do not require Locators, but most of the commands do require locators. The locators to be used depends on the AUT.
The various types of locator are:
Locator: ID
It is a common way to locate different elements as every element has a unique ID.
Target Format: id=id of the element
Consider any test app, let it be Facebook.
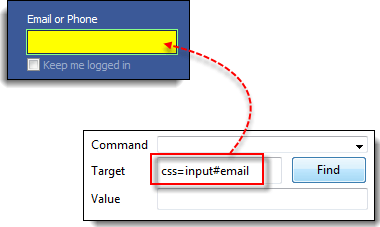
- Check the “Email” text box using Firebug and note down Locator: ID
- Launch Selenium IDE and write "id=(Locator ID you retrieved in the first step)" in the Target box. When you click on the Find button next to the target box, the “Email ID” text box will be emphasized with a yellow and green border. This means that Selenium IDE has located the “Email ID” text box correctly.
- Check the “Email” text box using Firebug and note down Locator: Name
- Launch Selenium IDE and write "Name=(Locator name you retrieved in the first step)" in the Target box. When you click on the Find button next to the target box, the “Email ID” text box will be emphasized with a yellow and green border. This means that Selenium IDE has located the “Email ID” text box correctly.
Locator: Link
This locator is used for hyperlink texts. It can be used by beginning the target with "link=" tailed by hyperlink text.
Target Format: link=link_text
Consider any web app as a text app.
- Check any element that has a hyperlink text and using Firebug and notes down Link Text
- Launch Selenium IDE and write "Link =(Link Text you retrieved in the first step)" in the Target box. When you click on the Find button next to the target box, the corresponding text box will be emphasized with a yellow and green border. This means that Selenium IDE has located the element correctly.
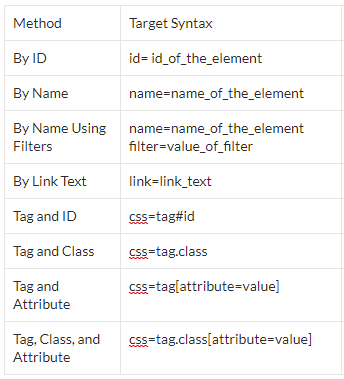
- Tag and ID
- Tag and class
- Tag and attribute
- Tag, class, and attribute
- Inner text
- Firebug
- XPath Checker
- File path
- XPath Finder
The Document Object Model is an HTML document that can be accessed using JavaScript. It uses hierarchical dotted notation to locate an element on the page.
 Conclusion
If you wish to learn more about selenium we have comprised a tutorial just for you which will take you deep into the tool.
Get an eBook: Download PDF

Recent Posts
- Positive Vs. Negative Testing: Examples, Difference & ImportanceApril 22nd, 2024
- What Is Statement Coverage Testing? Explained With Examples!April 13th, 2024
- 60 Important Automation Testing Interview Questions & AnswersApril 2nd, 2024
- Verification vs. Validation: Key Differences and Why They MatterMarch 19th, 2024
- What is Compatibility Testing? Example Test Cases Included!March 18th, 2024

Search Results for:
Loading...
Overview
Services
Industries

Follow us on
Contact Us
Copyright © 2026 | Digital Marketing by Jointviews