

Blog Category
 Mobile App Testing(136)
 Web App Testing(11)
 Game Testing(24)
 Automation Testing(73)
 Security Testing(32)
 Performance Testing(15)
 Selenium(32)
 Test Management(15)
 Usability Testing(24)
 Guides and Tutorials(99)
 Best Practices(28)
 Expert Insights(20)
 Software Testing Events(4)
Our Services
- App Testing(136)
- Web App Testing(11)
- Game Testing(24)
- Automation Testing(79)
 Load Testing(9)
- Security Testing(32)
 Performance Testing(15)
 Hire a Tester(71)
Our Careers

Jmeter Tutorial: Learn about the tool in a jiffy!
July 6th, 2020
Jmeter Tutorial blog by us will help you in learning about the famous tool and what's it is used for. Usually, Apache JMeter is used for performance testing. Performance testing is one of the important testings to be performed on AUT. It will let you know the load which your application can handle and what happens if that load exceeds prescribed limits.
Through, meter tutorial let us know more about JMeter and see how it can be used for performance testing.
 About JMeter - Jmeter tutorial introduction
JMeter is an open-source software which is designed by Apache Foundation. It is used to apply load to AUT to know its performance. With the help of JMeter, you will be able to apply a heavy load to the application with concurrent or multiple traffic to emulate real-time user behavior.
For applications such as Amazon who release flash day sales, it is very important to do performance testing. On a single day and in a time interval of 5 mins many customers hit the site and we must make sure that the application behaves expectedly without any flaws. One more application where performance testing is very important is the railway ticket booking website where a large chunk of people hit the server at the same time. In these cases, it becomes very necessary to test out the website under heavy load.
JMeter is usually used for testing of web or FTP application. With JMeter, you will able to identify how many concurrent users a server can handle. Thinking of hitting Amazon with 1000 concurrent users. For achieving the scenario, you cannot purchase 1000 machines to achieve the behavior. JMeter allows you to hit the Amazons server with 1000 requests concurrently. JMeter simulated real-time user’s behavior intelligently. JMeter sends requests to the target server and then retrieves the statistical information of the server. With this information, it generates test reports in different formats.
Some benefits which you gain via JMeter is a User-friendly GUI, Graphical Test Results, easy installation, and platform independence. It has an amazing record and playback feature which makes it very easy to learn even for the novice. Also, its script test can be integrated with Selenium tests and beach shells for more robust automated testing. Through the Jmeter tutorial, we are trying to et up a tutorial for people to learn about this magnificent tool.
About JMeter - Jmeter tutorial introduction
JMeter is an open-source software which is designed by Apache Foundation. It is used to apply load to AUT to know its performance. With the help of JMeter, you will be able to apply a heavy load to the application with concurrent or multiple traffic to emulate real-time user behavior.
For applications such as Amazon who release flash day sales, it is very important to do performance testing. On a single day and in a time interval of 5 mins many customers hit the site and we must make sure that the application behaves expectedly without any flaws. One more application where performance testing is very important is the railway ticket booking website where a large chunk of people hit the server at the same time. In these cases, it becomes very necessary to test out the website under heavy load.
JMeter is usually used for testing of web or FTP application. With JMeter, you will able to identify how many concurrent users a server can handle. Thinking of hitting Amazon with 1000 concurrent users. For achieving the scenario, you cannot purchase 1000 machines to achieve the behavior. JMeter allows you to hit the Amazons server with 1000 requests concurrently. JMeter simulated real-time user’s behavior intelligently. JMeter sends requests to the target server and then retrieves the statistical information of the server. With this information, it generates test reports in different formats.
Some benefits which you gain via JMeter is a User-friendly GUI, Graphical Test Results, easy installation, and platform independence. It has an amazing record and playback feature which makes it very easy to learn even for the novice. Also, its script test can be integrated with Selenium tests and beach shells for more robust automated testing. Through the Jmeter tutorial, we are trying to et up a tutorial for people to learn about this magnificent tool.

 2. The installation of JMeter is very easy. The download binary file must be unzipped into the folder where you want to download JMeter. The unzipped folder would like just as below snapshot.
 3. Run JMeter in GUI mode by clicking on the bin folder and then jmeter.bat file.
 4. After clicking, JMeter will open just as below.
 More on Thread Group, Samplers, Listeners and Configuration of JMeter


 It delays each request by the same amount of time.
 It delays each request by any random amount of time. You can define the deviation around which the delays would be adjusted. Also, offset can be added with the gaussian distribution of deviation value and then the total delay time can be calculated.
 It also delays each request by a random amount of time. You can define the random delay maximum time and the offset value which will be added to the random value.
 Also, we can validate the status code with the response assertion Select the field to test as response code and mention the code in the patterns to test.
 It tests that the server’s response is received time limits. If it is taking more than the time mentioned, then the assertion will be failed.
 It checks the response has the expected number of bytes contained in it. If it is above the defined limit, then assertion will be failed. In the below snapshot, if the response has equal or less than 5000 bytes then the assertion will be passed.
 JMeter will record your testing steps but for storing them in a container you require a recording controller.
 Simpler Controller is just a container to store your requests. You can give a meaningful name to the controller. In this way, if you want to duplicate the requests, you can simply add the simple controller without again and again adding so many requests. It is just for clubbing requests and in the view, results graph you will not see any controller name.

 The transaction controller is similar to the simple controller which records the overall time for the requests to finish. It has an additional benefit over simple controller as you will be able to see the controller name which has the clubbed requests instead of individual requests name in view results graph.
 It is based on the idea of modularity which says that a set of requests can be clubbed in a simple or transaction controller. A module controller can be used to add any set of requests by selecting the controller. Suppose if you have 3 simple controllers named login, search and logout, then with the module container you will be able to select which you want to simulate again so that you don’t have to add the same requests again and again.
 This controller pickups one sampler per iteration and it is executed from top to bottom. In the below snapshot, we are having one interleave controller having 3 samplers names News Page and FAQ Page and Gump Page. It is running with 2 threads and a loop count of 5. So, a total of 10 requests will be executed per thread.
 Processor in JMeter
Processors are used for modifying the samplers. There are two types of processors.
Processor in JMeter
Processors are used for modifying the samplers. There are two types of processors.
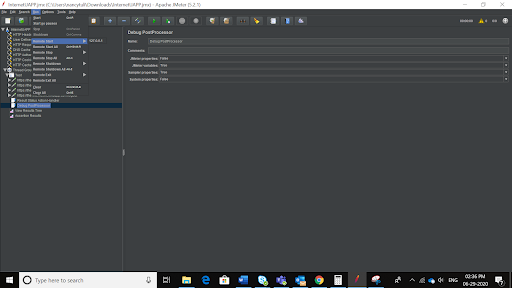
 In the above snapshot, if you choose Stop Test Now. This will stop the test if there will be any error in the response.
There is one more post-processor named debug processor which tracks the values of variables that are in the requests.
In the above snapshot, if you choose Stop Test Now. This will stop the test if there will be any error in the response.
There is one more post-processor named debug processor which tracks the values of variables that are in the requests.
 Jmeter Distributed (Remote) Testing
It is used to do testing on multiple systems. Applying all the load on a single server is not appropriate and can bring unexpected results. It is good to perform distributed testing with master-slave architecture. There will be one master who will be driving various clients which will be again JMeter servers which will be putting load to the application under test. The firewall should be switched off in all the machines as it can block the traffic. All machines should share the sub-network and the JMeter version should be kept the same in all the machines to avoid any kind of complexities.
Jmeter Distributed (Remote) Testing
It is used to do testing on multiple systems. Applying all the load on a single server is not appropriate and can bring unexpected results. It is good to perform distributed testing with master-slave architecture. There will be one master who will be driving various clients which will be again JMeter servers which will be putting load to the application under test. The firewall should be switched off in all the machines as it can block the traffic. All machines should share the sub-network and the JMeter version should be kept the same in all the machines to avoid any kind of complexities.
 Steps to setup master-slave architecture (Jmeter tutorial bonus)
1. Go to the slave server and then go to the bin directory where JMeter is downloaded. You must then execute a file named JMeter-server.bat. Suppose the slave machine has IP address 120.178.0.9.
2. Now, go to the master machine and go to the bin directory. There, you have to edit JMeter.properties file. You must add the IP of the slave machine in front of remote_hosts.
3. Now for running the tests, you must go to the GUI of JMeter. Select the Run section on the menu bar of JMeter and then select a remote start and then the IP address of the slave machine.
Steps to setup master-slave architecture (Jmeter tutorial bonus)
1. Go to the slave server and then go to the bin directory where JMeter is downloaded. You must then execute a file named JMeter-server.bat. Suppose the slave machine has IP address 120.178.0.9.
2. Now, go to the master machine and go to the bin directory. There, you have to edit JMeter.properties file. You must add the IP of the slave machine in front of remote_hosts.
3. Now for running the tests, you must go to the GUI of JMeter. Select the Run section on the menu bar of JMeter and then select a remote start and then the IP address of the slave machine.
 Detailed Steps to Use JMeter for Performance & Load Testing (Jmeter tutorial exclusive)
1. Start JMeter.
2. Add the BlazeMeter extension to the google chrome browser. Now hit the URL on the google chrome browser and record the flow with BlazeMeter. Once the steps have been captured then you can download the file from BlazeMeter in JMX extension.
3. You can then open the JMX file in your JMeter. It will appear as below.
Detailed Steps to Use JMeter for Performance & Load Testing (Jmeter tutorial exclusive)
1. Start JMeter.
2. Add the BlazeMeter extension to the google chrome browser. Now hit the URL on the google chrome browser and record the flow with BlazeMeter. Once the steps have been captured then you can download the file from BlazeMeter in JMX extension.
3. You can then open the JMX file in your JMeter. It will appear as below.
 4. Now, you must add a number of threads, ramp-up periods, and loop count. Number of Threads is the total number of users accessing the website. The number of times per thread will execute. Ramp-up period is the delay that should be applied before starting the next user. Suppose if you have 1000 users and a ramp period of 1000 seconds then delay between every user request will be 1000/1000 = 1 second.
 5. Now, add the listeners to view the graphical results. Let us add the most used listeners such as View Results and Assertions Results.
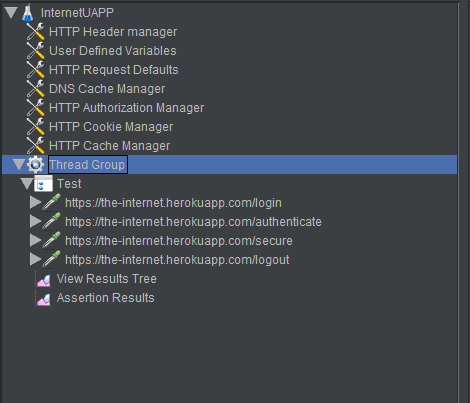 6. You can also name the requests in different transaction controllers such as login can go to login controller, authenticate, and secure to security controller and logout to sign off the controller. If you want to execute extensive tests, then these controllers will help you running many requests.
7. Add Post-processor which would stop the tests in case you get any errors in the response.
6. You can also name the requests in different transaction controllers such as login can go to login controller, authenticate, and secure to security controller and logout to sign off the controller. If you want to execute extensive tests, then these controllers will help you running many requests.
7. Add Post-processor which would stop the tests in case you get any errors in the response.
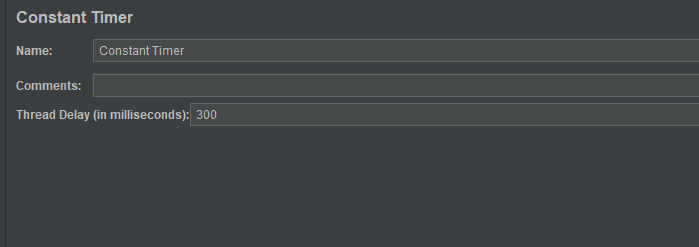
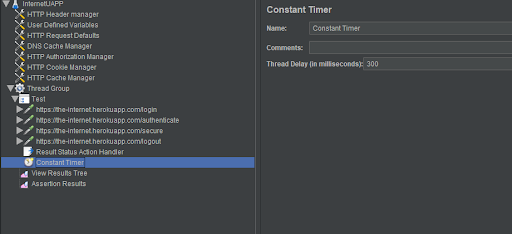
 8. Add Constant timer with a time period of 300 ms between each user request.
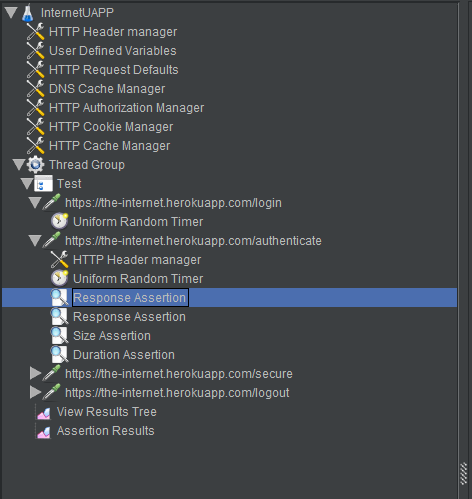
 9. For each request, you can add assertions to validate that if the requests are giving proper response. Different Response assertions can be used to validate the status code as 200 and to validate the test in the output response. You can also add duration assertion to check if the requests are completed in a particular amount of time. Size assertion can be used to check the response in bytes.
 10. Now, run the tests using the green run button on top. Now it’s time to analyze view results and assertion results.
 You have to analyze the throughput and deviation. Throughput is the server’s ability to handle a number of requests per minute. The higher the throughput the higher is the capacity of the server to handle user requests. The deviation is the second parameter which is of utmost importance in this graph to be analyzed. It means the variation from the average. Throughput should be higher, and deviation should be least. These parameters, you will be getting from the client which you have to validate and send a report to the client with these graphs.
Also, you must remember in this Jmeter tutorial, is the Assertion report.
You will see the different assertions been passed and failed in this tree so that you can know which ones are failing.
One more important listener is the View Results Tree listener. You will be seeing which requests got passed and which ones got failed. The ones which are in green color are passed and the ones which are in red color are failed.
The last important listener which you can add is the Summary report which will let you know total samples, average, Min, Max, Error %, Deviation, and Throughput. This report is of the utmost importance to stakeholders. Let us see how it looks.
Conclusion for Jmeter Tutorial
That sums Use JMeter tutorial to use performance and load testing so that your application is robust and can sand load without giving unexpected results. Use the wonderful elements of JMeter to share excellent reports with the stakeholders.
Hope you are satisfied with our Apache Jmeter tutorial. Please get back to us if you have any suggestions
You have to analyze the throughput and deviation. Throughput is the server’s ability to handle a number of requests per minute. The higher the throughput the higher is the capacity of the server to handle user requests. The deviation is the second parameter which is of utmost importance in this graph to be analyzed. It means the variation from the average. Throughput should be higher, and deviation should be least. These parameters, you will be getting from the client which you have to validate and send a report to the client with these graphs.
Also, you must remember in this Jmeter tutorial, is the Assertion report.
You will see the different assertions been passed and failed in this tree so that you can know which ones are failing.
One more important listener is the View Results Tree listener. You will be seeing which requests got passed and which ones got failed. The ones which are in green color are passed and the ones which are in red color are failed.
The last important listener which you can add is the Summary report which will let you know total samples, average, Min, Max, Error %, Deviation, and Throughput. This report is of the utmost importance to stakeholders. Let us see how it looks.
Conclusion for Jmeter Tutorial
That sums Use JMeter tutorial to use performance and load testing so that your application is robust and can sand load without giving unexpected results. Use the wonderful elements of JMeter to share excellent reports with the stakeholders.
Hope you are satisfied with our Apache Jmeter tutorial. Please get back to us if you have any suggestions
About JMeter - Jmeter tutorial introduction
JMeter is an open-source software which is designed by Apache Foundation. It is used to apply load to AUT to know its performance. With the help of JMeter, you will be able to apply a heavy load to the application with concurrent or multiple traffic to emulate real-time user behavior.
For applications such as Amazon who release flash day sales, it is very important to do performance testing. On a single day and in a time interval of 5 mins many customers hit the site and we must make sure that the application behaves expectedly without any flaws. One more application where performance testing is very important is the railway ticket booking website where a large chunk of people hit the server at the same time. In these cases, it becomes very necessary to test out the website under heavy load.
JMeter is usually used for testing of web or FTP application. With JMeter, you will able to identify how many concurrent users a server can handle. Thinking of hitting Amazon with 1000 concurrent users. For achieving the scenario, you cannot purchase 1000 machines to achieve the behavior. JMeter allows you to hit the Amazons server with 1000 requests concurrently. JMeter simulated real-time user’s behavior intelligently. JMeter sends requests to the target server and then retrieves the statistical information of the server. With this information, it generates test reports in different formats.
Some benefits which you gain via JMeter is a User-friendly GUI, Graphical Test Results, easy installation, and platform independence. It has an amazing record and playback feature which makes it very easy to learn even for the novice. Also, its script test can be integrated with Selenium tests and beach shells for more robust automated testing. Through the Jmeter tutorial, we are trying to et up a tutorial for people to learn about this magnificent tool.
Step-by-step Jmeter tutorial
How to Download and Install Apache JMeter JMeter is a java application and it needs Java in the machine so that it can run seamlessly. JMeter can be installed in Windows, Linux, Ubuntu, and Mac operating systems. Before installing JMeter, make sure that you have Java installed in your machine. You can check by hitting the command in your terminal. java -version If java version is highlighted then java is installed in your system and if nothing appears then install Java by clicking here.
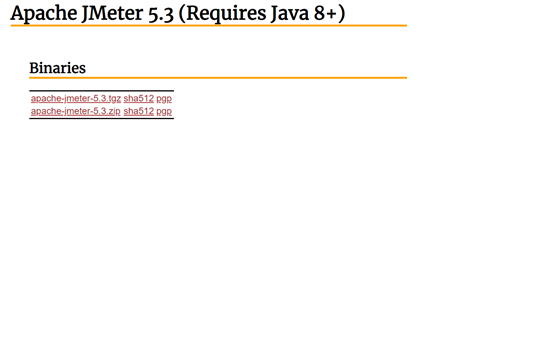
- Now it is the time to download JMeter. Download the latest version by clicking here. Download the binary file shown below.
2. The installation of JMeter is very easy. The download binary file must be unzipped into the folder where you want to download JMeter. The unzipped folder would like just as below snapshot.
3. Run JMeter in GUI mode by clicking on the bin folder and then jmeter.bat file.
4. After clicking, JMeter will open just as below.
More on Thread Group, Samplers, Listeners and Configuration of JMeter
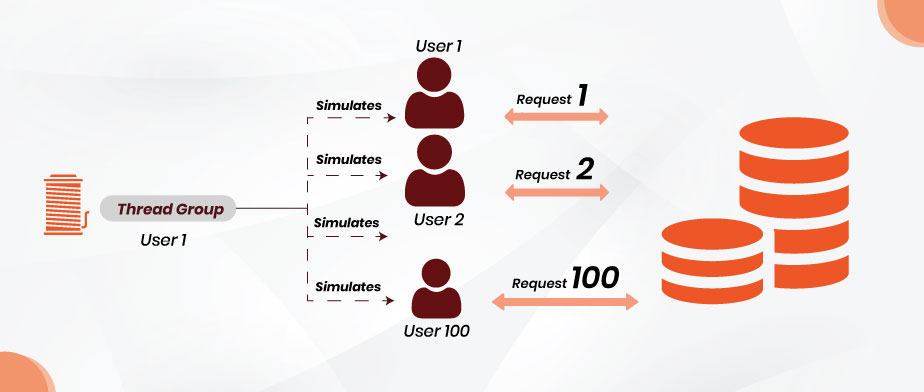
- Thread Group is basically the application of multiple threads to AUT. Each thread represents one user who is accessing the application. With the help of the thread group, you can apply a number of threads which is defined by you.
- Samplers allow JMeter to support testing of different protocols such as HTTP, FTP, JDBC, and others.
- FTP Request: If you want to do performance testing for the FTP server then you can use the config element of the FTP request. You can send a download a file or upload a file request to the FTP server. You need to add parameters to the sampler such as server name, remote file name (to be downloaded or uploaded), port number, username, and password.
- HTTP request
- JDBC request
- SMTP Server
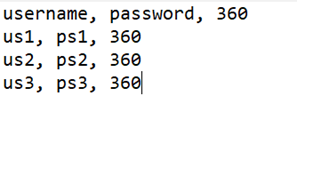
- CSV Data set Config
- HTTP Cookie Manager
- Listeners
- View Results Tree: You get to see all the user requests in HTML format using view results listener.
- Aggregate Reports
- Jmeter Timers
- Constant Timer
It delays each request by the same amount of time.
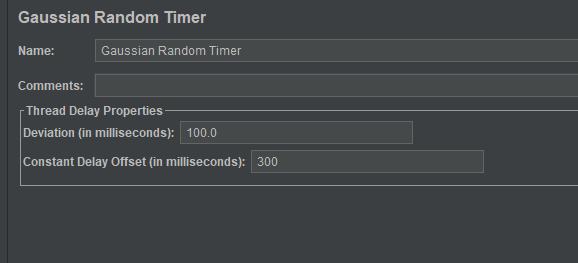
- Gaussian Random Timer
It delays each request by any random amount of time. You can define the deviation around which the delays would be adjusted. Also, offset can be added with the gaussian distribution of deviation value and then the total delay time can be calculated.
How to do load testing with Apache Jmeter? Click here
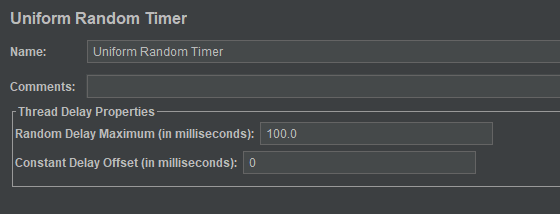
- Uniform Random Timer
It also delays each request by a random amount of time. You can define the random delay maximum time and the offset value which will be added to the random value.
- Bean shell, BSF and JSR223 timers
- Response assertion
Also, we can validate the status code with the response assertion Select the field to test as response code and mention the code in the patterns to test.
- Duration Assertion
It tests that the server’s response is received time limits. If it is taking more than the time mentioned, then the assertion will be failed.
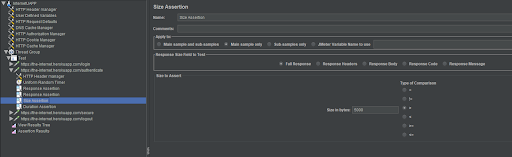
- Size Assertion
It checks the response has the expected number of bytes contained in it. If it is above the defined limit, then assertion will be failed. In the below snapshot, if the response has equal or less than 5000 bytes then the assertion will be passed.
- XML and HTML Assertion
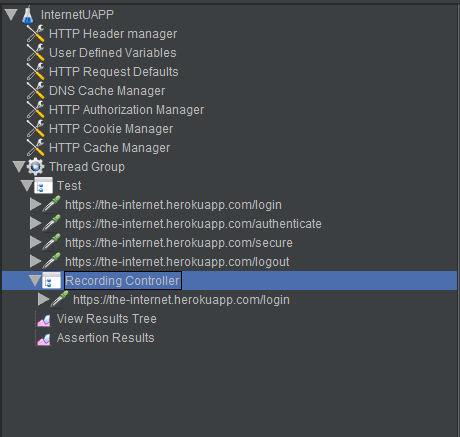
- Recording Controller
JMeter will record your testing steps but for storing them in a container you require a recording controller.
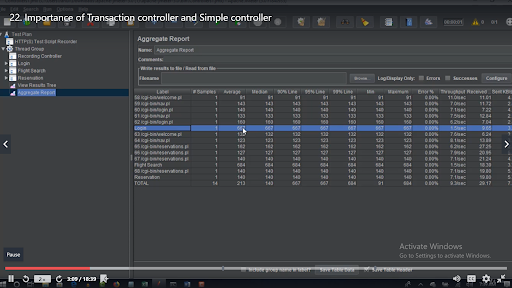
- Simple Controller
Simpler Controller is just a container to store your requests. You can give a meaningful name to the controller. In this way, if you want to duplicate the requests, you can simply add the simple controller without again and again adding so many requests. It is just for clubbing requests and in the view, results graph you will not see any controller name.
- Loop Controller
- Transaction Controller
The transaction controller is similar to the simple controller which records the overall time for the requests to finish. It has an additional benefit over simple controller as you will be able to see the controller name which has the clubbed requests instead of individual requests name in view results graph.
- Module Controller
It is based on the idea of modularity which says that a set of requests can be clubbed in a simple or transaction controller. A module controller can be used to add any set of requests by selecting the controller. Suppose if you have 3 simple controllers named login, search and logout, then with the module container you will be able to select which you want to simulate again so that you don’t have to add the same requests again and again.
- Interleave Controller
This controller pickups one sampler per iteration and it is executed from top to bottom. In the below snapshot, we are having one interleave controller having 3 samplers names News Page and FAQ Page and Gump Page. It is running with 2 threads and a loop count of 5. So, a total of 10 requests will be executed per thread.
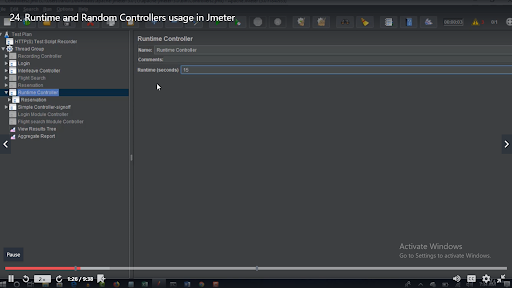
- Runtime Controller
- Random Controller
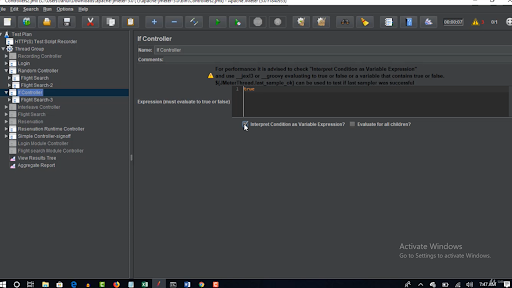
- If Controller
Processor in JMeter
Processors are used for modifying the samplers. There are two types of processors.
- Pre-processor are the processors which are applied before sampler requests. If you want JMeter to check all the links on the page and then retrieve the HTML. You can add HTML link parser which will parse links before a request is made to the server.
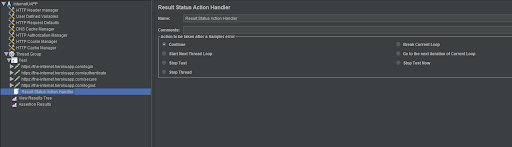
- Post-Processor: If the request is made to the server and is the requests send you an error then the post-processor should stop the further execution.
In the above snapshot, if you choose Stop Test Now. This will stop the test if there will be any error in the response.
There is one more post-processor named debug processor which tracks the values of variables that are in the requests.
Jmeter Distributed (Remote) Testing
It is used to do testing on multiple systems. Applying all the load on a single server is not appropriate and can bring unexpected results. It is good to perform distributed testing with master-slave architecture. There will be one master who will be driving various clients which will be again JMeter servers which will be putting load to the application under test. The firewall should be switched off in all the machines as it can block the traffic. All machines should share the sub-network and the JMeter version should be kept the same in all the machines to avoid any kind of complexities.
Steps to setup master-slave architecture (Jmeter tutorial bonus)
1. Go to the slave server and then go to the bin directory where JMeter is downloaded. You must then execute a file named JMeter-server.bat. Suppose the slave machine has IP address 120.178.0.9.
2. Now, go to the master machine and go to the bin directory. There, you have to edit JMeter.properties file. You must add the IP of the slave machine in front of remote_hosts.
3. Now for running the tests, you must go to the GUI of JMeter. Select the Run section on the menu bar of JMeter and then select a remote start and then the IP address of the slave machine.
Detailed Steps to Use JMeter for Performance & Load Testing (Jmeter tutorial exclusive)
1. Start JMeter.
2. Add the BlazeMeter extension to the google chrome browser. Now hit the URL on the google chrome browser and record the flow with BlazeMeter. Once the steps have been captured then you can download the file from BlazeMeter in JMX extension.
3. You can then open the JMX file in your JMeter. It will appear as below.
4. Now, you must add a number of threads, ramp-up periods, and loop count. Number of Threads is the total number of users accessing the website. The number of times per thread will execute. Ramp-up period is the delay that should be applied before starting the next user. Suppose if you have 1000 users and a ramp period of 1000 seconds then delay between every user request will be 1000/1000 = 1 second.
5. Now, add the listeners to view the graphical results. Let us add the most used listeners such as View Results and Assertions Results.
6. You can also name the requests in different transaction controllers such as login can go to login controller, authenticate, and secure to security controller and logout to sign off the controller. If you want to execute extensive tests, then these controllers will help you running many requests.
7. Add Post-processor which would stop the tests in case you get any errors in the response.
8. Add Constant timer with a time period of 300 ms between each user request.
9. For each request, you can add assertions to validate that if the requests are giving proper response. Different Response assertions can be used to validate the status code as 200 and to validate the test in the output response. You can also add duration assertion to check if the requests are completed in a particular amount of time. Size assertion can be used to check the response in bytes.
10. Now, run the tests using the green run button on top. Now it’s time to analyze view results and assertion results.
You have to analyze the throughput and deviation. Throughput is the server’s ability to handle a number of requests per minute. The higher the throughput the higher is the capacity of the server to handle user requests. The deviation is the second parameter which is of utmost importance in this graph to be analyzed. It means the variation from the average. Throughput should be higher, and deviation should be least. These parameters, you will be getting from the client which you have to validate and send a report to the client with these graphs.
Also, you must remember in this Jmeter tutorial, is the Assertion report.
You will see the different assertions been passed and failed in this tree so that you can know which ones are failing.
One more important listener is the View Results Tree listener. You will be seeing which requests got passed and which ones got failed. The ones which are in green color are passed and the ones which are in red color are failed.
The last important listener which you can add is the Summary report which will let you know total samples, average, Min, Max, Error %, Deviation, and Throughput. This report is of the utmost importance to stakeholders. Let us see how it looks.
Conclusion for Jmeter Tutorial
That sums Use JMeter tutorial to use performance and load testing so that your application is robust and can sand load without giving unexpected results. Use the wonderful elements of JMeter to share excellent reports with the stakeholders.
Hope you are satisfied with our Apache Jmeter tutorial. Please get back to us if you have any suggestions
Recent Posts
- Positive Vs. Negative Testing: Examples, Difference & ImportanceApril 22nd, 2024
- What Is Statement Coverage Testing? Explained With Examples!April 13th, 2024
- 60 Important Automation Testing Interview Questions & AnswersApril 2nd, 2024
- Verification vs. Validation: Key Differences and Why They MatterMarch 19th, 2024
- What is Compatibility Testing? Example Test Cases Included!March 18th, 2024

Search Results for:
Loading...
Overview
Services
Industries


Follow us on
Contact Us
Copyright © 2026 | Digital Marketing by Jointviews