Selenium Tutorial For Beginners [Step by Step]
April 1st, 2019
![Selenium Tutorial For Beginners [Step by Step]](https://wp.testbytes.net/wp-content/uploads/2019/04/Selenium-Tutorial-A-Complete-guide-1.jpg)
Everybody knows about the impeccable selenium! The ultimate tool for testing web applications! for you to learn in detail about how to carry out automation testing, we have written an extensive Selenium tutorial just for you!
This blog comprises of three part,
1. Selenium Tutorial For Beginners
2. Selenium Intermediate Level Tutorial
3. Selenium Advanced level Tutorial
Selenium Tutorial For Beginners
What makes Selenium better?
You don’t need to code anything in Selenium and with this; any beginner will be able to record and play the simplest web application scripts.
Usually, Selenium RC needs a server to be up and running for sending commands to the browser. It is used for cross-browser testing and you can write the code in any language.
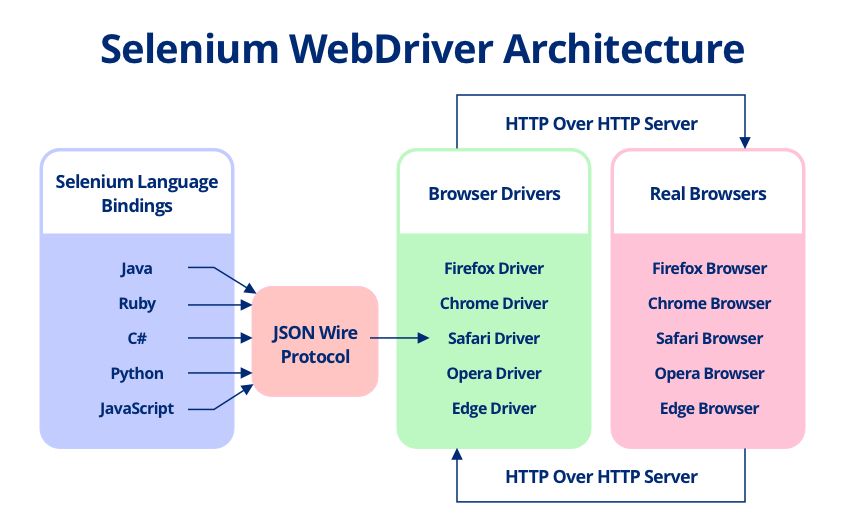
Selenium Web Driver is a better version of IDE and RC. It directly sends commands to the browser without the need of a server to be up and running.

Different languages can be used for coding the scripts like Java, C#, PHP, Python, Perl, and Ruby. Selenium Grid is used for parallel testing in multiple browsers and environments. It used the hub and node concept where hub acts as a source of Selenium commands and each node is connected to it.
Now, here we will discuss Selenium WebDriver. How a beginner can start learning Selenium WebDriver and how he can excel in it.
Now, first, we will look at the steps we need to follow to download Selenium Web Driver in your machine.
Ways to download and install Selenium WebDriver
- You should have Java installed in your machine. This is the pre-requisite for Selenium Web Driver to work.
- You can visit the page: http://seleniumhq.org/download/ and download the client drivers and language bindings. You have the select binding for Java.
- This download will be named – selenium-2.25.0.zip.
- Now, you can import all the Jars in Eclipse. You have to right click on the project and import jar files by selecting all the downloaded jar files. For this, you can click on the Libraries tab and then click on “Add External JARs”.
Now Let’s look the First Selenium WebDriver Script
Let’s take an example of the first Selenium Script which we would create using Selenium basic methods.
Let’s first look at the script in detail. In this script, we will do the following test steps.
- Go to the home page of the test application
- Verify the title of the page
- Do a comparison of the result.
- Close the browser after the script is done.
package projectSelenium;
import org.openqa.selenium.WebDriver;
import org.openqa.selenium.chrome.ChromeDriver;
public class seleniumTest {
public static void main(String[] args) {
System.setProperty(“webdriver.chrome.driver”,”C:\\chromeDriver.exe”);
WebDriver driver = new ChromeDriver();
String baseUrl = “https://google.com”;
String expectedTitle = “Google”;
String actualTitle = “”;
// launch Fire fox and direct it to the Base URL
driver.get(baseUrl);
// get the actual value of the title
actualTitle = driver.getTitle();
/*
* compare the actual title of the page with the expected one and print
* the result as “Passed” or “Failed”
*/
if (actualTitle.contentEquals(expectedTitle)){
System.out.println(“Test Passed!”);
} else {
System.out.println(“Test Failed”);
}
driver.close();
}
}
Things to look at the above code:
- In the first two lines, we have imported two packages. You have to import – org.openqa.selenium and org.openqa.selenium.firefox.FirefoxDriver.
- The most important step is to instantiate the browser. This is done by line
WebDriver driver = new ChromeDriver();
//This is done to invoke a chrome browser.
You can invoke a FireFox browser by following line of code
WebDriver driver = new FirefoxDriver();
You can invoke an IE browser by following line of code:
WebDriver driver = new InternetExplorerDriver ();
Also, while invoking a browser you have to pass the path of the executable file. You can do it by following line of code:
System.setProperty(“webdriver.chrome.driver”,”Path of chrome driver”);
System.setproperty(“webdriver.ie.driver”,”Path of ie driver”);
- Get() method is used to enter a url in a browser.
- getTitle() method of selenium webdriver is used to fetch the title of a web page.
- Now, we have to compare the expected title with the actual title.
If(expectedTitle.equals(actualTitle))
{
System.out.println(“TEST PASSED”):
}
- For terminating the browser, close() method is used. Driver.close() closes the active browser window. If you want to close all the opened browser windows by selenium web driver then you can use driver.quit().
- You can run this test by right clicking on the program and then select as “Run As” as “Java Application”.
- Next thing which is of utmost important while writing a test script is to identify web Elements which will be explained in detail in the below section.
Locating Web Elements
Locating web elements is very easy. Various selectors are available for that process. find Elements is one such 2 in which selenium webdriver is used for locating a web element and then, you can perform an action on that.
Know More: Selenium Automation Testing With Cucumber Integration
Let’s see some of the methods by which you can identify web element on a web page.
- className – It will locate web element based on the class attribute. Eg: By.className(“abc”);
- cssSelector – used to locate web element based on css selector engine. Eg:- By.cssSelector(“#abc”);
- id – If some web element has id attribute, then you can directly identify the web element using id tag. Eg:- By.id(“abc”);
- linkText – It will find a link element by text mentioned by you in the test script. By.linkText(“Login”);
- name – If any web element has name attached to it then you can identify it using name attribute. Eg: By.name(“name”);
- partialText – It will find a link element by text containing the text mentioned by you in the test script. By.partialText(“abc”);
- tagName – It will locate all elements which will have this tag.
- xpath – It is the most used locator in a selenium test script. It will identify the element using html path. It can be relative or absolute. Absolute xpath traverses the path of the web element by root and relative takes the reference of any web element and then traverse to that specified web element. It is better to refer an element by relative xpath rather than absolute xpath.
Basic Actions on a web element
You can click on a web element by using click() method of selenium web driver. You can locate a web element and then perform an action on it.
Eg: driver.findElement(By.xpath(“”)).click();
Also, you can send keys to a particular web element by using send Keys() method of selenium web driver. You can locate a web element and then you can enter some text in it using sendKeys() method.
Eg: driver.findElement(By.xpath(“”)).sendKeys(“name”);
Also, there are other actions which you can perform on a web element by using action class.
WebElement wb = driver.findElement(By.xpath(“”));
Actions actions = new Actions(Driver);
Actions.moveToElement(wb).build(). Perform ();
You can even switch to alert boxes which come when you click on some webelement. You can do it by switchTo().alert() method.
Eg code:
WebElement wb = driver.findElement(By.xpath(“”));
Wb.click();
Driver.switchTo().alert();
Now, you will be able to access the alert box. You can retrieve the message displayed in the text box by getting the text from it.
String alertMessage = driver.switchTo().alert().getText();
Also, you can accept the alert box by function accept(). You can see the sample code as below:
Driver.switchTo().alert().accept();
You can even check conditional operations on a web element.
Also, check whether a web element is enabled or not. If it will be enabled then you can do some operation on it.
Apart from all these, you can check if some web element is displayed or not. In the case of radio buttons, you can check if the radio button is selected or not. You can do these checks by – isEnabled(), isSelected() and isDisplayed() option.
Waits in Selenium Web Driver
If you want some step to get completed before any other step then you have to wait for the prior step to get completed. In manual testing, it is very easy to achieve but in automation testing, it is bit tedious and you have to wait for the previous step to get completed or a condition to be fulfilled before moving on wards to the next step.
This can be achieved by adding waits in between. There are two types of wait- explicit and implicit wait. If you are expecting a particular condition to be fulfilled before moving to the next step,
Another feature is that you can use explicit wait while if you just want a universal wait, then you can go ahead to use implicit wait. The implicit wait is used to set the default time out for the whole script.
A perfect automation script is made by adding both type of waits – Explicit and Implicit. You have to judiciously use both types of waits to make an efficient test case.
Know More : Top 50 Selenium Interview Questions and Answers
Explicit Wait
Syntax of Explicit Wait:
WebDriverWait wait = new WebDriverWait(WebDriverRefrence,TimeOut);
wait.until(ExpectedConditions.visibilityOfElementLocated(By.xpath(“”));
Expected Condition can be used with so many conditions. Some conditions which can be used with it are:
- alertIsPresent()
- elementSelectionStateToBe()
- elementToBeClickable()
- elementToBeSelected()
- frameToBeAvaliableAndSwitchToIt()
- invisibilityOfTheElementLocated()
- invisibilityOfElementWithText()
- presenceOfAllElementsLocatedBy()
- presenceOfElementLocated()
- textToBePresentInElement()
- textToBePresentInElementLocated()
- textToBePresentInElementValue()
- titleIs()
- titleContains()
- visibilityOf()
- visibilityOfAllElements()
- visibilityOfAllElementsLocatedBy()
- visibilityOfElementLocated()
Implicit Wait
Syntax of Implicit Wait:
driver.manage().timeouts().implicitlyWait(TimeOut, TimeUnit.SECONDS);
For this, you have to import a package into your code. The package name is java.util.concurrent.TimeUnit;
Selenium Intermediate Level Tutorial
Through the section Selenium Tutorial for Beginners, We gave you the basic info that you need to know about the tool. Now let’s go further and learn much more about this impeccable web app testing tool.
How to upload a file in Selenium test cases?
To upload a file, first, you have to identify the element on which you have to upload your file. There you can directly use sendKeys() function of selenium web driver. You can pass the path of the location in sendKeys. In this way, you will be able to upload a file using selenium web driver.

public static void main(String[] args) {
System.setProperty(“webdriver.gecko.driver”,”path of gecko driver”);
String baseUrl = “http://www.google.com /upload/”;
WebDriver driver = new FirefoxDriver();
driver.get(baseUrl);
WebElement element = driver.findElement(By.id(“id of element”));
uploadElement.sendKeys(“C:\\newhtml.html”);
//Here, above you have to pass the path of the file where your file is located.
// Then you can click the upload file link
driver.findElement(By.xpath(“”)).click();
}
How to use a web table in selenium script
You have to access a web table and the elements present in the table. You can get it by making an xpath. Suppose you have had1 0a table with four blocks.

The first thing which you have to do is to find the XPath of the web element in this web table. Let’s say you want to get to the third element in the above web element.
The coding of the above web table is as below:

Now, you can analyze that first there is a table and then there is a tbody. In that tbody there are two rows. One row is having two tables. The first row is having two cells – First and Second. The second row is having two cells – Third and Fourth.
Our goal is to reach to the third cell. Let’s try to make the XPath of it.
The XPath of it will be //table/tbody/tr[2]/td[1]
So, the table is the parent node from which we will iterate to go the third element. From there, we will go to the tbody section and then the second row. From there we will get the first column.
Let’s write a script to get the text out of it.
public static void main(String[] args) {
String url = “http://testsite.com/test/write-xpath-table.html”;
WebDriver driver = new FirefoxDriver();
driver.get(baseUrl);
String txtWebelement = driver.findElement( By.xpath(“//table/tbody/tr[2]/td[1]”).getText();
System.out.println(txtWebelement);
driver.close();
}
}
Let’s take an example of a nested web table. You have to then analyze it carefully and get the XPath of it. Let’s look at the example below to get more information on it.

So, if you want to access the web element which is having text 10-11-12 then you can do it by traversing from the table and then iterating through the rows and columns to reach there.
Xpath would be: //table/tbody/tr[2]/td[2]/table/tbody/tr[2]/td[2]
public static void main(String[] args) {
String url = “http://testsite.com/test/write-xpath-table.html”;
WebDriver driver = new FirefoxDriver();
driver.get(baseUrl);
String txtWebelement = driver.findElement( By.xpath(“//table/tbody/tr[2]/td[2]/table/tbody/tr[2]/td[2]
”)getText();
System.out.println(txtWebelement);
driver.close();
}
}
This way, you can iterate through the rows and columns to reach to a specific cell from a web table.
Now, one of the most important concepts in selenium which will help you in many cases when you won’t be retrieving any text from a web element or to enable a web element to get the text or to perform any action on it.
Let’s talk about JavaScript Executor in detail. It is an interface which helps to execute javascript.
JavaScript Executor
Sometimes you are not able to click on a web element using click() function. You can then use javascript executor to execute click function on a web element. Let’s have a look at the code.
WebDriver driver= new FirefoxDriver();
// JavascriptExecutor interfaceobject creation by type casting driver object
JavascriptExecutor js = (JavascriptExecutor)driver;
You can now click on a webelement using below command.
WebElement button = driver.findElement(By.xpath(“”));
Js.executeScript(“arguments[0].click();”,button);
Also, if send keys isn’t working. You can make use of java script executor to send keys. Let’s look at the example below.
WebDriver driver= new FirefoxDriver();
// JavascriptExecutor interfaceobject creation by type casting driver object
JavascriptExecutor js = (JavascriptExecutor)driver;
js.executeScript(“document.getElementById(‘id’).value=”value;”);
You can even make use of java script executor to refresh a web page. You can do it by following command:
WebDriver driver= new FirefoxDriver();
// JavascriptExecutor interfaceobject creation by type casting driver object
JavascriptExecutor js = (JavascriptExecutor)driver;
js.executeScript(“history.go(0)”);
Sometimes, getText() doesn’t work and then you have to make use of java script executor to get text of a web element. You can do it by following line of code:
WebDriver driver= new FirefoxDriver();
// JavascriptExecutor interfaceobject creation by type casting driver object
JavascriptExecutor js = (JavascriptExecutor)driver;
js.executeScript(“history.go(0)”);
Sysout(js.executeScript(“return document.documentElement.innerText;”).toString());
You can even get the title and URL of a web page using java script executor. The procedure is very simple. Let’s have a look at the following lines of code.
WebDriver driver= new FirefoxDriver();
// JavascriptExecutor interfaceobject creation by type casting driver object
JavascriptExecutor js = (JavascriptExecutor)driver;
System.out.println(js.executeScript(“return document.title;”).toString());
System.out.println(js.executeScript(“return document.URL;”).toString());
Desired Capabilities Concept in selenium web driver
You can make the set of configurations on which you want a particular test script to run. You can pass browser name, version to specify the type of environment on which you want a test case to run.
Let’s see some of the capabilities which you can set in a test case for IE browser.
//it is used to define IE capability
DesiredCapabilities cap = DesiredCapabilities.internetExplorer();
cap.setCapability(CapabilityType.BROWSER_NAME, “IE”);
cap.setCapability(InternetExplorerDriver.INTRODUCE_FLAKINESS_BY_IGNORING_SECURITY_DOMAINS,true);
In the above capability, we have passed the capability browser name and we have ignored the security domain.
After setting the capabilities you can pass the capabilities to the web driver instance so that it executes the test on a particular configuration.
Let’s have a look at the complete set of code.
public static void main(String[] args) {
//it is used to define IE capability
DesiredCapabilities cap = DesiredCapabilities.internetExplorer();
cap.setCapability(CapabilityType.BROWSER_NAME, “IE”);
cap.setCapability(InternetExplorerDriver.INTRODUCE_FLAKINESS_BY_IGNORING_SECURITY_DOMAINS,true);
System.setProperty(“webdriver.ie.driver”, “path of executable”);
WebDriver driver = new InternetExplorerDriver(capabilities);
driver.get(“http://gmail.com”);
driver.quit();
}
Handling a drop down in selenium web driver
You have to first import following packages: org.openqa.selenium.support.ui.Select.
First, you have to identify from DOM whether the dropdown is of select type or not. If it is of select type then you have to go for the below steps.
Then, you have to uniquely identify the select tag. You have to first make the object of Select class and pass the element for which you have to choose the options from the drop-down.
Select dropdown = new Select(driver.findElement(By.xpath(“”)));
Now, there are three main methods which you have to use to select any element from this select object.
- selectByVisibleText
- selectByIndex
- selectByValue
You can either select any element from this drop-down by matching the visible text with that of the text passed by you. You can also select any web element from the drop-down using an index. Last option is to select by value tag.
Also, there are some more functions which are available. Some of them are selectAll() and deselectAll() too select and deselect all the elements when more than one element can be selected.
But, if the dropdown is not of select type then you can’t go for the conventional method. You have to follow another method. You have to uniquely identify the web element on which you have to select a dropdown option. You can identify it and the sendKeys() function of selenium web driver to send keys to the uniquely identified dropdown.
WebElement dropdown = driver.findElement(By.xpath(“”));
Dropdown.sendKeys(“value to be selected”);
How to select the checkbox and radio button is selenium
Sometimes, you come across situations where you have to select checkboxes and radio buttons. You can do it easily with selenium web driver. You just have to use click() function of web driver to click on checkbox and radio button. You can even check of the web element is selected or not.
.isSelected() checks if any web element is selected or not.
It gives false if the web element is not selected and it gives true if the web element is selected.
This way, you can handle radio buttons and checkboxes in a selenium script.
Selenium Advanced level Tutorial
Now, you know almost the stuff which is required for selenium intermediate and beginner level. Now, you are proficient enough to deal with all the advanced level of selenium web driver. You can then practice those and while you are done with those, you can move forward to the advanced level of course.
Let’s see what lies ahead and what can give you an edge in your interviews. You can look at this advanced course so that you can be ahead of all the candidates who just know the basic and intermediate selenium course. Let’s have a look at Selenium Advanced level Tutorial
Selenium Grid
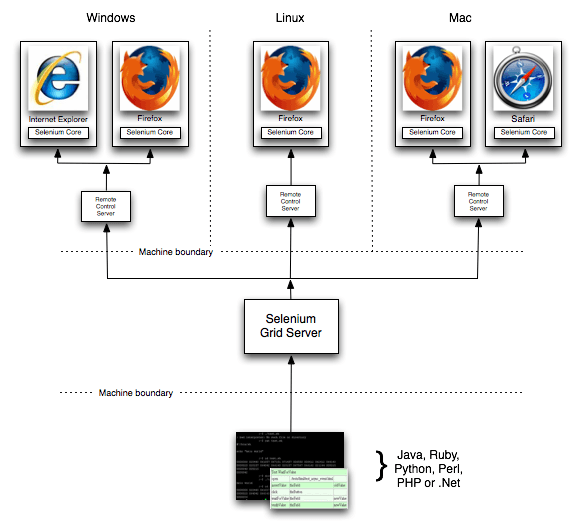
Selenium Grid is issued for running various tests on different browsers, operating systems, and machines in parallel. It used a hub and node concept. You don’t want test cases to run on a single machine. You have your machine as a hub and various systems on which test cases will be distributed. You call those machines as nodes.
The hub is the central point and there should be only one hub in a system. This hub is your machine from which you want to distribute the test cases among all the clients.
This is the machine on which test cases will run and those will be executed on the nodes. There can be more than one node. Nodes can have different configurations with different platforms and browsers.
Let’s see how you can establish a selenium grid in your machine.
You can download the selenium grid server from the official site. You can place Selenium server.jar in a hard drive. You have to place it in all nodes and hub c drive.
Open the command prompt in your hub and then, go to C directory. There you have to fire the below command java -jar selenium-server-standalone-2.30.0.jar -role hub
Now, if you want to check if the selenium grid server is running on localhost that is 4040 port or not. You can visit the local host on your browser.
You have to then go to C directory of the node and open command prompt in it. Also, when you have made the selenium grid server up in the hub, you have to note down the IP address and port.
java -Dwebdriver.gecko.driver=”C:\geckodriver.exe” -jar selenium-server-standalone-3.4.0.jar -role webdriver -hub ip address of hub -port port number of hub
When you fire the above command, again go to hub browser and the port number 4040. Refresh the page and you will see IP address which will be linked to the hub.
Now, you have set up machines with different configurations. But how would the hub know which test case would be run on which node.
This will be done by desired capabilities which will tell that this test script would run on a particular set of configuration.
One can do it using below source code:
This way, you will be able to distribute the test cases across different machines and browsers. You will be able to do parallel testing using Selenium Grid.
Maven and Jenkins Integration with Selenium
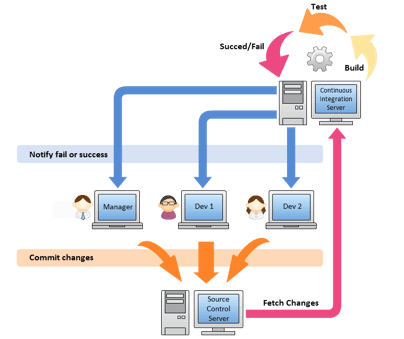
Maven is a build management tool which is used to make the build process easy. Maven avoids hard coding of jars and you can easily share the project structure across the team using artifact and version id.
Every team member would be at the same page. You can make a maven project by going to File – New – Other – Maven project. You have to then specify the artifact id and then version id. You will be prompted to select a template. For starting, select a quik start template.
You will get a folder structure where you will be having two folders – src/main/java and src/main/test. In java folder, you will maintain all other stuff except tests while in test folder you will maintain all the test cases.
You will be having pom.xml file where you have to define all the dependencies so that it can download from the maven repository and place them in ./m2 repository in your local project structure.
You can get the dependency from the maven official site and then place in pom.xml. It will download all the required jars.
Also, Jenkins issued for continuous integration of the latest build with the production environment. Whenever a developer will fire the latest build then the smoke test will start running on that build.
If the build gets passed then it can be deployed to the production else the developer and tester would get a notification about the failed build. It makes the delivery cycle very fast.
Also, you can do it by downloading Jenkins war file and then running it so that Jenkins server will be up and running on port number 4040.

After doing that you can install all the necessary plug-ins. You can then create a new item and does the post-build actions.
Also, you can pass the path of git repository from which it will fetch the latest build. If you are using a local server then you pass the path of pom.xml from the system.
You can even set nightly runs with Jenkins, You have to specify the time when you want your test to run. They will run and you will get the reports on the Jenkins server the next morning. Isn’t it time-saving?
Database Testing using Selenium WebDriver
Integrating Selenium tests to the database is so easy in the latest version of the tool. You have to make use of JDBC library for database connections. It allows connection of Java and databases. First, make a connection to the database with the following command:
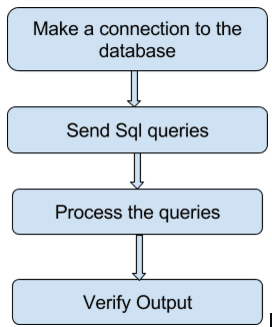
DriverManager.getConnection(URL, “userid”, “password” )
After doing that you can load the JDBC driver. You can do it by following lines of code:
Class.forName(“com.mysql.jdbc.Driver”);
Now, you have to send the query to the database. How will you do it? You can create an object of a statement class and then execute the query using the statement object.
Statement stmt = con.createStatement();
stmt.executeQuery(select * from employee;);
Now, you can get the result in the result set. You can do it by following command:
ResultSet rs= stmt.executeQuery(query);
After doing all the operations, you can close the connection.
Con.close();
In this way, you can get the result set and then do all the validations on the result set.
How to take screenshots in selenium web driver
You should get the screenshot of the failed test cases so that you can get to know where exactly is the problem. This will help in better-debugging skills.
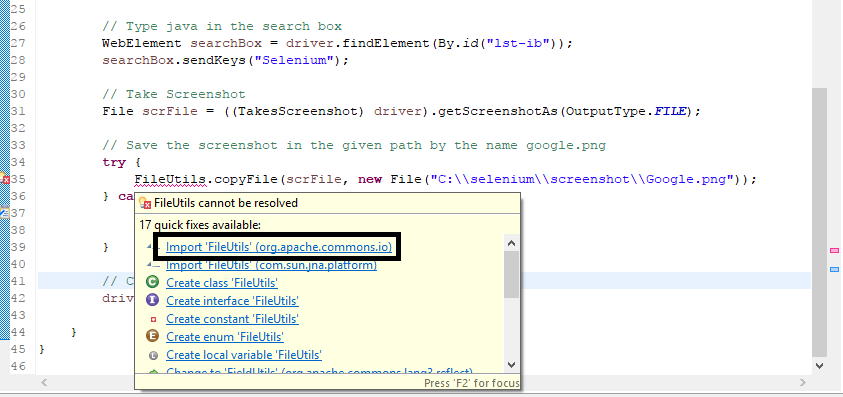
Let’s look at the steps involved in taking a screenshot:
TakesScreenshot scrShot =((TakesScreenshot)webdriver);
This step caste a driver instances to Takes Screenshot interface. Now, you have one method which is getting screenshots which will get the image file.
File SrcFile=scrShot.getScreenshotAs(OutputType.FILE);
Now, you have taken the screenshot but you have to place it somewhere. You can create some folder which will be used for storing all the screenshots captured during the execution.
You can do it by following the line of code:
FileUtils.copyFile(SrcFile, DestFile);
This is the way to capture screenshots. But if you want that only the screenshot is taken when a test case fails. You can use ITestListener.
It has various methods and one of the methods is onFailure() which will do the specified task when every there is any failure in a test case.
So you can put this code in that method so that whenever any test fails it will take the screenshot and place it in the folder specified by you.
How to drag and drop in a web page using Selenium Web driver
Now if you want o drag and drop something o a web page, you would be confused. It is very simple. You have to make use of Actions class which gives you a method dragAndDrop() which will drag and drop a web element from a source destination to the desired destination.
Actions actions = new Actions(driver);
Actions. dragAndDrop(Sourcelocator, Destinationlocator).build().perform();
Make sure that the source locator and destination locator have correct xpaths. In this way, you will be able to drag and drop any element on a web page.
How to do right click and double click on a web page
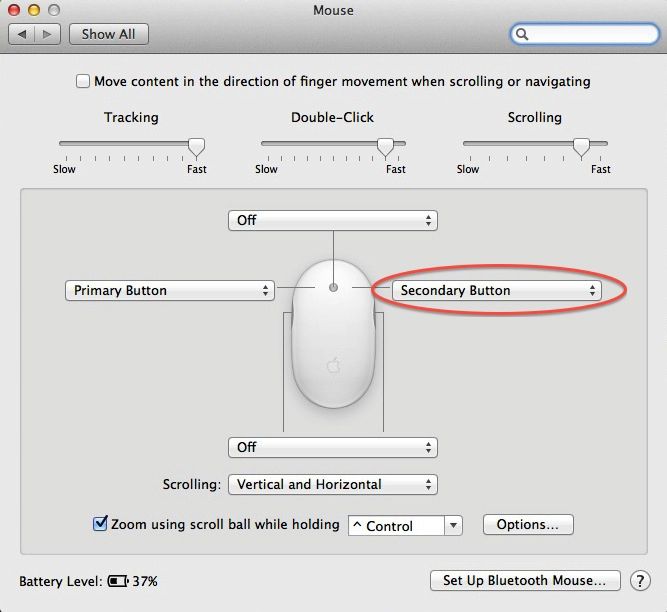
You can do a right-click on a web page using Actions class. Actions class provides a doubleClick method which allows to double click on a web element. You can do it by following lines of code:
Actions actions = new Actions(driver);
WebElement elementLocator = driver.findElement(By.id(“ID”));
actions.doubleClick(elementLocator).perform();
You have to do right-click in selenium using action class only. It is very easy. It provides a method – contextClick() and then right click on a web element.
Actions actions = new Actions(driver);
WebElement elementLocator = driver.findElement(By.id(“ID”));
actions.contextClick(elementLocator).perform();
This way, you will be able to right click and double click on a web element.
How to switch to an iFrame

iFrame is a web page which is embedded into another web page. Whenever you want to click on a web element, which is in another iframe. First, you have to switch to that iframe and then perform an action on it.
You can do switching by
Driver.switchTo().frame(index or name or id of iframe);
Conclusion
Before learning Selenium it’s better to have a thorough understanding of any object-oriented language. languages that Selenium support includes, Java, Perl, C#, PHP, Ruby, and Python Currently.
We genuinely hope this tutorial has helped in understanding selenium better.
Get a eBook : Download PDF


 Software Testing Events
 App Testing
 Web App Testing
 Game Testing
 Automation Testing
 Load Testing
 Security Testing
 Performance Testing
 Hire a Tester

