

Blog Category
 Mobile App Testing(136)
 Web App Testing(11)
 Game Testing(24)
 Automation Testing(73)
 Security Testing(32)
 Performance Testing(15)
 Selenium(32)
 Test Management(15)
 Usability Testing(24)
 Guides and Tutorials(99)
 Best Practices(28)
 Expert Insights(20)
 Software Testing Events(4)
Our Services
- App Testing(136)
- Web App Testing(11)
- Game Testing(24)
- Automation Testing(79)
 Load Testing(9)
- Security Testing(32)
 Performance Testing(15)
 Hire a Tester(71)
Our Careers

AngularJS Testing Tutorial - Cypress, Karma and Protractor
May 7th, 2020
AngularJS testing using selenium is not a good approach. Due to the asynchronous behavior of the application selenium is not able to handle the asynchronous calls.
So it is necessary to make use of angularJS testing tools so that asynchronous behavior of the application can be handled. Let us see some good approaches to test angular JS websites below.
Unit Testing AngularJS Apps
To make sure that unit testing is happening easily when it comes to AngularJS Testing, Angular JS has been provided with dependency injection for your XHR requests. The main reason behind is to simulate requests. The model can also be tested by altering the DOM directly. in short, individual sort function can be tested in isolation.
 What is Karma?
Karma is a JS runner created by the angular JS team themselves. and is one of the best when it comes to AngularJS Testing.
Jasmine is the framework for testing angular JS code while karma provides us with various methods which makes it easier to call Jasmine tests.
For installing karma, you need to install node JS in your machine. After installing node JS, install Karna using npm installer.
How to test AngularJS apps using Karma?
First of all,
One can install karma using below command
npm install karma --save-dev
After running this command, karma dependencies will be installed. It will be present in package.Json after you run the above command. For making karma available globally use -g option so that you can invoke it from anywhere.
Now, the next step is to install karma plugin which would help us in using the jasmine framework and google chrome browser. Run the below command:
npm install karma-jasmine karma-chrome-launcher --save-dev
After running this command, start making tests in command prompt. For creating tests, run the following command.
mkdir tests // for making tests directory
touch tests/test1.controller.test.JS //For creating a test called test1
After creating a test, now it is time to put code in test1.
describe(test1,function(){
beforeEach(module(test1));
var$controller;
beforeEach(inject(function(_$controller_){
$controller=_$controller_;
}));
describe('sub',function(){
it('1 - 1 should equal 0',function(){
var$scope={};
varcontroller=$controller(test1Controller,{$scope:$scope});
$scope.x=1;
$scope.y= 1;
$scope.sub();
expect($scope.z).toBe(0);
});
});
});
Now, after creating the test you should know how to create a test runner, and before creating that we should know the configuration required for the test runner. For configuring the test runner perform the following steps.
karma init karma.conf.JS
Now, for running the tests using the test runner run the following command.
karma start karma.conf.JS
The test output should look like the underlying code.
> @ test /Users/devuser/repos/test1
> ./node_modules/karma/bin/karma start karma.conf.JS
INFO [karma]: Karma server started at http://localhost:8080/
INFO [launcher]: Starting browser Chrome
INFO [Chrome 80]: Connected on socket 2absOkNfa1asasaX0fCJ with id 66276373
Chrome 80 test1 encountered a declaration exception FAILED
ReferenceError: module is not defined
at Suite.<anonymous>(/Users/devuser/repos/repo1/tests/test1.controller.test.JS:3:13)
at /Users/devuser/repos/repo1/tests/test1.controller.test.JS:1:1
Chrome 80): Executed 1 of 1 (1 FAILED) ERROR (0.01 secs / 0.005 secs)
Now, add the following lines to your package.JSon.
{
"scripts":{
"test":"karma start karma.conf.JS"
},
Now with the help of this script, we will be able to run any test using npm command. Using the below command, run the jasmine tests.
npmtest
Now, it is time to add the controller logic and for adding it run the following commands.
mkdir app
touch app/test1.controller.JS
Add the following code in test1.controller.JS
angular.module(test1,[]).controller('testController',functiontestController($scope){
$scope.sub=function(){
$scope.z=$scope.x-$scope.y;
};
});f
For adding the angular dependencies, run the following commands. Make a directory called lib in your project and then add all libraries in that folder.
mkdir lib
curl -o lib/angular.min.JShttps://code.angularJS.org/1.4.0-rc.2/angular.min.JS
curl -o lib/angular-mocks.JShttps://code.angularJS.org/1.4.0-rc.2/angular-mocks.JS
Now, it is time to edit the karma config file so that it comes to know about the test folder and the library folder so that jasmine tests can run successfully.
files:[
'lib/angular.min.JS',
'lib/angular-mocks.JS',
'app/*.JS',
'tests/*.JS'
],
Now, run the tests using the npm test. Your test will run now successfully.
How to test AngularJS applications using Protractor?
What is Karma?
Karma is a JS runner created by the angular JS team themselves. and is one of the best when it comes to AngularJS Testing.
Jasmine is the framework for testing angular JS code while karma provides us with various methods which makes it easier to call Jasmine tests.
For installing karma, you need to install node JS in your machine. After installing node JS, install Karna using npm installer.
How to test AngularJS apps using Karma?
First of all,
One can install karma using below command
npm install karma --save-dev
After running this command, karma dependencies will be installed. It will be present in package.Json after you run the above command. For making karma available globally use -g option so that you can invoke it from anywhere.
Now, the next step is to install karma plugin which would help us in using the jasmine framework and google chrome browser. Run the below command:
npm install karma-jasmine karma-chrome-launcher --save-dev
After running this command, start making tests in command prompt. For creating tests, run the following command.
mkdir tests // for making tests directory
touch tests/test1.controller.test.JS //For creating a test called test1
After creating a test, now it is time to put code in test1.
describe(test1,function(){
beforeEach(module(test1));
var$controller;
beforeEach(inject(function(_$controller_){
$controller=_$controller_;
}));
describe('sub',function(){
it('1 - 1 should equal 0',function(){
var$scope={};
varcontroller=$controller(test1Controller,{$scope:$scope});
$scope.x=1;
$scope.y= 1;
$scope.sub();
expect($scope.z).toBe(0);
});
});
});
Now, after creating the test you should know how to create a test runner, and before creating that we should know the configuration required for the test runner. For configuring the test runner perform the following steps.
karma init karma.conf.JS
Now, for running the tests using the test runner run the following command.
karma start karma.conf.JS
The test output should look like the underlying code.
> @ test /Users/devuser/repos/test1
> ./node_modules/karma/bin/karma start karma.conf.JS
INFO [karma]: Karma server started at http://localhost:8080/
INFO [launcher]: Starting browser Chrome
INFO [Chrome 80]: Connected on socket 2absOkNfa1asasaX0fCJ with id 66276373
Chrome 80 test1 encountered a declaration exception FAILED
ReferenceError: module is not defined
at Suite.<anonymous>(/Users/devuser/repos/repo1/tests/test1.controller.test.JS:3:13)
at /Users/devuser/repos/repo1/tests/test1.controller.test.JS:1:1
Chrome 80): Executed 1 of 1 (1 FAILED) ERROR (0.01 secs / 0.005 secs)
Now, add the following lines to your package.JSon.
{
"scripts":{
"test":"karma start karma.conf.JS"
},
Now with the help of this script, we will be able to run any test using npm command. Using the below command, run the jasmine tests.
npmtest
Now, it is time to add the controller logic and for adding it run the following commands.
mkdir app
touch app/test1.controller.JS
Add the following code in test1.controller.JS
angular.module(test1,[]).controller('testController',functiontestController($scope){
$scope.sub=function(){
$scope.z=$scope.x-$scope.y;
};
});f
For adding the angular dependencies, run the following commands. Make a directory called lib in your project and then add all libraries in that folder.
mkdir lib
curl -o lib/angular.min.JShttps://code.angularJS.org/1.4.0-rc.2/angular.min.JS
curl -o lib/angular-mocks.JShttps://code.angularJS.org/1.4.0-rc.2/angular-mocks.JS
Now, it is time to edit the karma config file so that it comes to know about the test folder and the library folder so that jasmine tests can run successfully.
files:[
'lib/angular.min.JS',
'lib/angular-mocks.JS',
'app/*.JS',
'tests/*.JS'
],
Now, run the tests using the npm test. Your test will run now successfully.
How to test AngularJS applications using Protractor?
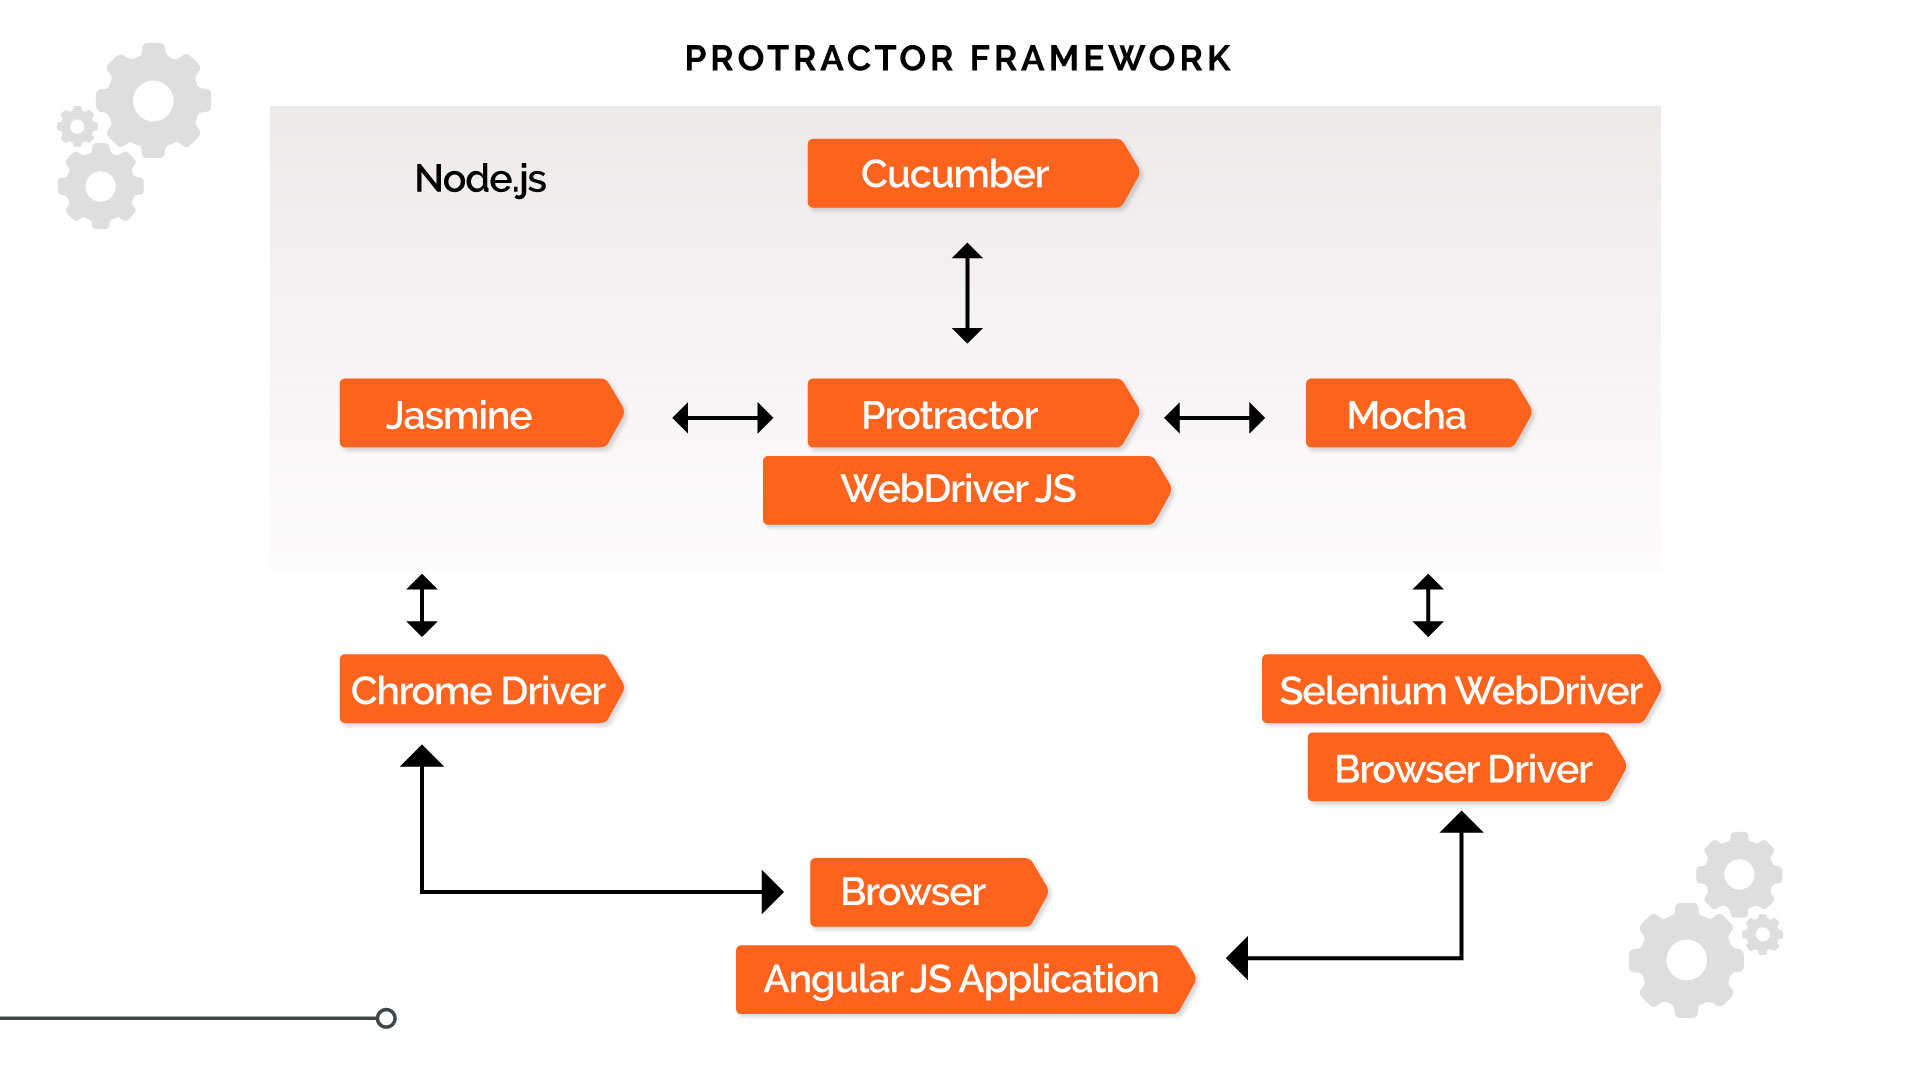 Protractor is impeccable when it comes to AngularJS Testing. In Angular JS applications are hard to test since the application web elements cannot be captured very easily.
Angular JS applications have some extra attributes like ng-repeater, ng-controller, and ng-model which can be identified using Selenium locators. Protractor is a NodeJS program which is written in JavaScript. The pre-requisite of using Protractor is Selenium and NPM.
Let us see how you can proceed with the installation of Protractor. Run the following command to start with the installation of the protractor.
npm install –g protractor
It will install protractor in your system. Using -g will make it available globally in your system. Now, after installation of protractor If you want to check the version of the protractor. You can find the following by running the following command.
Protractor is impeccable when it comes to AngularJS Testing. In Angular JS applications are hard to test since the application web elements cannot be captured very easily.
Angular JS applications have some extra attributes like ng-repeater, ng-controller, and ng-model which can be identified using Selenium locators. Protractor is a NodeJS program which is written in JavaScript. The pre-requisite of using Protractor is Selenium and NPM.
Let us see how you can proceed with the installation of Protractor. Run the following command to start with the installation of the protractor.
npm install –g protractor
It will install protractor in your system. Using -g will make it available globally in your system. Now, after installation of protractor If you want to check the version of the protractor. You can find the following by running the following command.
 Protractor –version
For running the protractor tests against the application under test, you would need webDriver manager. Now, you must update the webDriver manager to the latest version. For updating it, run the following command.
webdriver-manager update
Now you must be imagining how would you start the webdriver-manager. You can start it by running in the background by running the following command. It will then listen to all your protractor tests which have to be run against the angular JS application.
webdriver-manager start
Now to see if the webdriver manager plugin if it is properly running or not. Go to the URL: http://localhost:4444/wd/hub/static/resource/hub.htmland you will see the webdriver manager plugin running on it.
Now, we will see how to design the test cases in protractor. To start with designing o the test cases you need 2 files. One is the spec file and the other is the config file. The configuration file has the location for the protractor tests. Also remember, chrome is the default browser for a protractor. While the second file, the spec file has the logics and locators which would be used to interact with the application.
Now, let’s take a test case in which we have to go to URL: https://angularJS.org, and then you have to type your name in the textbox. After entering you will see your name as Hello Name!
Now, let us start with the steps which are required for making this test case and to execute it. In your folder, you will have 2 files. One is spec.JS and the other is conf.JS. The logic for spec.JS which will be there in it.
describe('Enter yourname, function() {it('should add a Name as your name, function() {browser.get('https://angularJS.org'); element(by.model('yourName')).sendKeys(‘Name’); var name= element(by.xpath('html/body/div[2]/div[1]/div[2]/div[2]/div/h1'));expect(name.getText()).toEqual('Hello Name!'); });});
Now, if you see that describe comes from the Jasmine framework. It is basically a module and it can be a class or a function. We are giving this module name as “Enter Your Name”. So, for starting the function we start it with describe keyword. Just like a class can have many methods or a TestNG class can have so many test cases. Similarly, in the Jasmine framework, it starts a new test case.
browser.get('https://angularJS.org');
This command is used for opening the browser with URL mentioned as https://angularJS.org. Now, you must identify the elements. So, you have to inspect the element just like you do in Selenium. You can use By.model for the elements who have ng-model as an attribute.
You can store Web elements in a variable. You can declare a variable using var keyword. Now, it is time to have some assertions. You get the text out of this web element and then compare it to the expected text.
Now, you are done with spec.JS and let us start with the conf.JS. You have to define the path of spec here so that tests can be identified easily.
Paste the following code in conf.JS
exports.config = {seleniumAddress: 'http://localhost:4444/wd/hub', specs: ['spec.JS']};
Selenium address is the location where it can communicate with the selenium webdriver. Spcs tell the location of spec.JS
Now, for running the test, first navigate to the directory in which spec.JS and conf.JS are located. First thing to keep in mind that webdriver-manager should be started. If not started, you have to first start it with following command.
webdriver-manager start
Now, it’s time to run the configuration file. After starting the webdriver-manager plugin, run the config.JS file using protractor. Fire the following command.
protractor conf.JS
You have seen how many specs got passed and how many got failed.
Now let's see how the failure is going to be reflected in the console. We make the assertion false.
Modify the code in spec.JS
describe('Enter your name, function() {it('should add a Name as your name, function() {browser.get('https://angularJS.org'); element(by.model('yourName')).sendKeys(‘Name’); var name= element(by.xpath('html/body/div[2]/div[1]/div[2]/div[2]/div/h1'));expect(name.getText()).toEqual('Hello!'); });});
You will see F which means failed test case. You will get to know the complete description where the test case got failed.
Now, you must be imagining how would the reports be integrated with Jasmine. Let’s install the Jasmine reporter. Run the following command:
npm install --save-dev jasmine-reporters@^2.0.0
If you want jasmine reporter to installed globally. For installing globally, run the following command.
npm install –g jasmine-reporters@^2.0.0
You have to now modify the conf.JS. You have to add Jasmine reporter in it. Add the following code in it.
exports.config = {seleniumAddress: 'http://localhost:4444/wd/hub', capabilities: { 'browserName': ‘Chrome’ }, specs: ['spec.JS'], framework: 'jasmine2' ,onPrepare: function() { var jasmineReporters = require('C:/Users/User1/node_modules/jasmine-reporters');jasmine.getEnv().addReporter(new jasmineReporters.JUnitXmlReporter(null, true, true) ); } };
Now, run the tests using protractor conf.JS. You will see the junitresult.xml in the folder path given in conf.JS.
Open the XML file and see the result of the test case. In this way, you can take the help of protractor to test angular JS websites.
How to test the AngularJS app using Cypress?
Cypress is very close to the application. It just has a very thin layer between production code and testing code. It is Javascript E2E testing framework.
It is an open-source AngularJS Testing framework Cypress has bundled various packages such as Mocha, Chai, and Sinon. The only supportive language with Cypress is Javascript. When you open the cypress application using command cypress open, the following application will open.
This application is divided into two parts. On the left side, you write commands. There are different keywords to it. VISIT is for opening the URL and GET is for getting a webelement. CLICK is for clicking on the webelement. Using ASSERT, we can add assertions to our test cases.
For installing Cypress, you should have node.JS installed in your machine. You can then use the npm installer to add dependencies of Cypress.
npmicypress -D
Now for opening the cypress test runner, run the following command.
npx cypress open
If you want your application and Cypress to run at the same time then you have to make some changes in your package.JSon.
"cypress": "concurrently \"ng serve\" \"cypress open\""
Add these lines in package.JSon.
Now, run the following command
npm run cypress
When you add a new project in cypress then you will have below folder structure.
Fixtures have static data that has to be used by your tests. You can use them by cy.fixture() command. In the integration folder, you will have your integration tests. The plugin helps you to tweak to your test cases. Just like plugins have a file named index.JS which have a method which will run before every spec file. In Support files, you can have your reusable code.
Now, it is time to create your first test in the integration folder. You name it as test1.spec.JS. You will see it in the Cypress test runner also. Cypress API is present under the global cy project. Now let us put some code in it.
describe("Test1", () => {
it("should visit home page", () => {
cy.visit("http://localhost:4200/login");
});
});
It makes use of description and it blocks from the mocha syntax. It makes the beginning of the test cases. Once you will run this test In the test explorer, on the right side, the execution starts.
When you will run Cypress for the first time, you will see that the cypress.JSon file will get generated. In this, you can store your configuration values. Now let’s store our base URL in cypress. JSON so that we don’t have to change the URL in every test case.
{
"baseUrl":"http://localhost:4200"
}
It’s time to change the code in spec.JS also.
describe("Test1",()=>{
it("shouldvisit home page",()=>{
cy.visit("/login");
});
});
Now for getting webelement, you can make use of a cypress selector background in the test runner. It is present on the left side of the test runner. You can get the XPath from there.
Use this way to get the webelements.
cy.get('.btn-link').click();
cy.url().should('include', '/register')
This assertion will check the check has registered keywords in it. Hence, we are done with the first test case in cypress.
Protractor –version
For running the protractor tests against the application under test, you would need webDriver manager. Now, you must update the webDriver manager to the latest version. For updating it, run the following command.
webdriver-manager update
Now you must be imagining how would you start the webdriver-manager. You can start it by running in the background by running the following command. It will then listen to all your protractor tests which have to be run against the angular JS application.
webdriver-manager start
Now to see if the webdriver manager plugin if it is properly running or not. Go to the URL: http://localhost:4444/wd/hub/static/resource/hub.htmland you will see the webdriver manager plugin running on it.
Now, we will see how to design the test cases in protractor. To start with designing o the test cases you need 2 files. One is the spec file and the other is the config file. The configuration file has the location for the protractor tests. Also remember, chrome is the default browser for a protractor. While the second file, the spec file has the logics and locators which would be used to interact with the application.
Now, let’s take a test case in which we have to go to URL: https://angularJS.org, and then you have to type your name in the textbox. After entering you will see your name as Hello Name!
Now, let us start with the steps which are required for making this test case and to execute it. In your folder, you will have 2 files. One is spec.JS and the other is conf.JS. The logic for spec.JS which will be there in it.
describe('Enter yourname, function() {it('should add a Name as your name, function() {browser.get('https://angularJS.org'); element(by.model('yourName')).sendKeys(‘Name’); var name= element(by.xpath('html/body/div[2]/div[1]/div[2]/div[2]/div/h1'));expect(name.getText()).toEqual('Hello Name!'); });});
Now, if you see that describe comes from the Jasmine framework. It is basically a module and it can be a class or a function. We are giving this module name as “Enter Your Name”. So, for starting the function we start it with describe keyword. Just like a class can have many methods or a TestNG class can have so many test cases. Similarly, in the Jasmine framework, it starts a new test case.
browser.get('https://angularJS.org');
This command is used for opening the browser with URL mentioned as https://angularJS.org. Now, you must identify the elements. So, you have to inspect the element just like you do in Selenium. You can use By.model for the elements who have ng-model as an attribute.
You can store Web elements in a variable. You can declare a variable using var keyword. Now, it is time to have some assertions. You get the text out of this web element and then compare it to the expected text.
Now, you are done with spec.JS and let us start with the conf.JS. You have to define the path of spec here so that tests can be identified easily.
Paste the following code in conf.JS
exports.config = {seleniumAddress: 'http://localhost:4444/wd/hub', specs: ['spec.JS']};
Selenium address is the location where it can communicate with the selenium webdriver. Spcs tell the location of spec.JS
Now, for running the test, first navigate to the directory in which spec.JS and conf.JS are located. First thing to keep in mind that webdriver-manager should be started. If not started, you have to first start it with following command.
webdriver-manager start
Now, it’s time to run the configuration file. After starting the webdriver-manager plugin, run the config.JS file using protractor. Fire the following command.
protractor conf.JS
You have seen how many specs got passed and how many got failed.
Now let's see how the failure is going to be reflected in the console. We make the assertion false.
Modify the code in spec.JS
describe('Enter your name, function() {it('should add a Name as your name, function() {browser.get('https://angularJS.org'); element(by.model('yourName')).sendKeys(‘Name’); var name= element(by.xpath('html/body/div[2]/div[1]/div[2]/div[2]/div/h1'));expect(name.getText()).toEqual('Hello!'); });});
You will see F which means failed test case. You will get to know the complete description where the test case got failed.
Now, you must be imagining how would the reports be integrated with Jasmine. Let’s install the Jasmine reporter. Run the following command:
npm install --save-dev jasmine-reporters@^2.0.0
If you want jasmine reporter to installed globally. For installing globally, run the following command.
npm install –g jasmine-reporters@^2.0.0
You have to now modify the conf.JS. You have to add Jasmine reporter in it. Add the following code in it.
exports.config = {seleniumAddress: 'http://localhost:4444/wd/hub', capabilities: { 'browserName': ‘Chrome’ }, specs: ['spec.JS'], framework: 'jasmine2' ,onPrepare: function() { var jasmineReporters = require('C:/Users/User1/node_modules/jasmine-reporters');jasmine.getEnv().addReporter(new jasmineReporters.JUnitXmlReporter(null, true, true) ); } };
Now, run the tests using protractor conf.JS. You will see the junitresult.xml in the folder path given in conf.JS.
Open the XML file and see the result of the test case. In this way, you can take the help of protractor to test angular JS websites.
How to test the AngularJS app using Cypress?
Cypress is very close to the application. It just has a very thin layer between production code and testing code. It is Javascript E2E testing framework.
It is an open-source AngularJS Testing framework Cypress has bundled various packages such as Mocha, Chai, and Sinon. The only supportive language with Cypress is Javascript. When you open the cypress application using command cypress open, the following application will open.
This application is divided into two parts. On the left side, you write commands. There are different keywords to it. VISIT is for opening the URL and GET is for getting a webelement. CLICK is for clicking on the webelement. Using ASSERT, we can add assertions to our test cases.
For installing Cypress, you should have node.JS installed in your machine. You can then use the npm installer to add dependencies of Cypress.
npmicypress -D
Now for opening the cypress test runner, run the following command.
npx cypress open
If you want your application and Cypress to run at the same time then you have to make some changes in your package.JSon.
"cypress": "concurrently \"ng serve\" \"cypress open\""
Add these lines in package.JSon.
Now, run the following command
npm run cypress
When you add a new project in cypress then you will have below folder structure.
Fixtures have static data that has to be used by your tests. You can use them by cy.fixture() command. In the integration folder, you will have your integration tests. The plugin helps you to tweak to your test cases. Just like plugins have a file named index.JS which have a method which will run before every spec file. In Support files, you can have your reusable code.
Now, it is time to create your first test in the integration folder. You name it as test1.spec.JS. You will see it in the Cypress test runner also. Cypress API is present under the global cy project. Now let us put some code in it.
describe("Test1", () => {
it("should visit home page", () => {
cy.visit("http://localhost:4200/login");
});
});
It makes use of description and it blocks from the mocha syntax. It makes the beginning of the test cases. Once you will run this test In the test explorer, on the right side, the execution starts.
When you will run Cypress for the first time, you will see that the cypress.JSon file will get generated. In this, you can store your configuration values. Now let’s store our base URL in cypress. JSON so that we don’t have to change the URL in every test case.
{
"baseUrl":"http://localhost:4200"
}
It’s time to change the code in spec.JS also.
describe("Test1",()=>{
it("shouldvisit home page",()=>{
cy.visit("/login");
});
});
Now for getting webelement, you can make use of a cypress selector background in the test runner. It is present on the left side of the test runner. You can get the XPath from there.
Use this way to get the webelements.
cy.get('.btn-link').click();
cy.url().should('include', '/register')
This assertion will check the check has registered keywords in it. Hence, we are done with the first test case in cypress.
 Conclusion
Now, we have seen different ways of AngularJS Testing. Make use o
f these and test the application in the best possible ways. Optimize your code and have the best test integration practices so that the client can be satisfied with your test metrics. All the best.
Conclusion
Now, we have seen different ways of AngularJS Testing. Make use o
f these and test the application in the best possible ways. Optimize your code and have the best test integration practices so that the client can be satisfied with your test metrics. All the best.
What is Karma?
Karma is a JS runner created by the angular JS team themselves. and is one of the best when it comes to AngularJS Testing.
Jasmine is the framework for testing angular JS code while karma provides us with various methods which makes it easier to call Jasmine tests.
For installing karma, you need to install node JS in your machine. After installing node JS, install Karna using npm installer.
How to test AngularJS apps using Karma?
First of all,
One can install karma using below command
npm install karma --save-dev
After running this command, karma dependencies will be installed. It will be present in package.Json after you run the above command. For making karma available globally use -g option so that you can invoke it from anywhere.
Now, the next step is to install karma plugin which would help us in using the jasmine framework and google chrome browser. Run the below command:
npm install karma-jasmine karma-chrome-launcher --save-dev
After running this command, start making tests in command prompt. For creating tests, run the following command.
mkdir tests // for making tests directory
touch tests/test1.controller.test.JS //For creating a test called test1
After creating a test, now it is time to put code in test1.
describe(test1,function(){
beforeEach(module(test1));
var$controller;
beforeEach(inject(function(_$controller_){
$controller=_$controller_;
}));
describe('sub',function(){
it('1 - 1 should equal 0',function(){
var$scope={};
varcontroller=$controller(test1Controller,{$scope:$scope});
$scope.x=1;
$scope.y= 1;
$scope.sub();
expect($scope.z).toBe(0);
});
});
});
Now, after creating the test you should know how to create a test runner, and before creating that we should know the configuration required for the test runner. For configuring the test runner perform the following steps.
karma init karma.conf.JS
Now, for running the tests using the test runner run the following command.
karma start karma.conf.JS
The test output should look like the underlying code.
> @ test /Users/devuser/repos/test1
> ./node_modules/karma/bin/karma start karma.conf.JS
INFO [karma]: Karma server started at http://localhost:8080/
INFO [launcher]: Starting browser Chrome
INFO [Chrome 80]: Connected on socket 2absOkNfa1asasaX0fCJ with id 66276373
Chrome 80 test1 encountered a declaration exception FAILED
ReferenceError: module is not defined
at Suite.<anonymous>(/Users/devuser/repos/repo1/tests/test1.controller.test.JS:3:13)
at /Users/devuser/repos/repo1/tests/test1.controller.test.JS:1:1
Chrome 80): Executed 1 of 1 (1 FAILED) ERROR (0.01 secs / 0.005 secs)
Now, add the following lines to your package.JSon.
{
"scripts":{
"test":"karma start karma.conf.JS"
},
Now with the help of this script, we will be able to run any test using npm command. Using the below command, run the jasmine tests.
npmtest
Now, it is time to add the controller logic and for adding it run the following commands.
mkdir app
touch app/test1.controller.JS
Add the following code in test1.controller.JS
angular.module(test1,[]).controller('testController',functiontestController($scope){
$scope.sub=function(){
$scope.z=$scope.x-$scope.y;
};
});f
For adding the angular dependencies, run the following commands. Make a directory called lib in your project and then add all libraries in that folder.
mkdir lib
curl -o lib/angular.min.JShttps://code.angularJS.org/1.4.0-rc.2/angular.min.JS
curl -o lib/angular-mocks.JShttps://code.angularJS.org/1.4.0-rc.2/angular-mocks.JS
Now, it is time to edit the karma config file so that it comes to know about the test folder and the library folder so that jasmine tests can run successfully.
files:[
'lib/angular.min.JS',
'lib/angular-mocks.JS',
'app/*.JS',
'tests/*.JS'
],
Now, run the tests using the npm test. Your test will run now successfully.
How to test AngularJS applications using Protractor?
Protractor is impeccable when it comes to AngularJS Testing. In Angular JS applications are hard to test since the application web elements cannot be captured very easily.
Angular JS applications have some extra attributes like ng-repeater, ng-controller, and ng-model which can be identified using Selenium locators. Protractor is a NodeJS program which is written in JavaScript. The pre-requisite of using Protractor is Selenium and NPM.
Let us see how you can proceed with the installation of Protractor. Run the following command to start with the installation of the protractor.
npm install –g protractor
It will install protractor in your system. Using -g will make it available globally in your system. Now, after installation of protractor If you want to check the version of the protractor. You can find the following by running the following command.
Protractor –version
For running the protractor tests against the application under test, you would need webDriver manager. Now, you must update the webDriver manager to the latest version. For updating it, run the following command.
webdriver-manager update
Now you must be imagining how would you start the webdriver-manager. You can start it by running in the background by running the following command. It will then listen to all your protractor tests which have to be run against the angular JS application.
webdriver-manager start
Now to see if the webdriver manager plugin if it is properly running or not. Go to the URL: http://localhost:4444/wd/hub/static/resource/hub.htmland you will see the webdriver manager plugin running on it.
Now, we will see how to design the test cases in protractor. To start with designing o the test cases you need 2 files. One is the spec file and the other is the config file. The configuration file has the location for the protractor tests. Also remember, chrome is the default browser for a protractor. While the second file, the spec file has the logics and locators which would be used to interact with the application.
Now, let’s take a test case in which we have to go to URL: https://angularJS.org, and then you have to type your name in the textbox. After entering you will see your name as Hello Name!
Now, let us start with the steps which are required for making this test case and to execute it. In your folder, you will have 2 files. One is spec.JS and the other is conf.JS. The logic for spec.JS which will be there in it.
describe('Enter yourname, function() {it('should add a Name as your name, function() {browser.get('https://angularJS.org'); element(by.model('yourName')).sendKeys(‘Name’); var name= element(by.xpath('html/body/div[2]/div[1]/div[2]/div[2]/div/h1'));expect(name.getText()).toEqual('Hello Name!'); });});
Now, if you see that describe comes from the Jasmine framework. It is basically a module and it can be a class or a function. We are giving this module name as “Enter Your Name”. So, for starting the function we start it with describe keyword. Just like a class can have many methods or a TestNG class can have so many test cases. Similarly, in the Jasmine framework, it starts a new test case.
browser.get('https://angularJS.org');
This command is used for opening the browser with URL mentioned as https://angularJS.org. Now, you must identify the elements. So, you have to inspect the element just like you do in Selenium. You can use By.model for the elements who have ng-model as an attribute.
You can store Web elements in a variable. You can declare a variable using var keyword. Now, it is time to have some assertions. You get the text out of this web element and then compare it to the expected text.
Now, you are done with spec.JS and let us start with the conf.JS. You have to define the path of spec here so that tests can be identified easily.
Paste the following code in conf.JS
exports.config = {seleniumAddress: 'http://localhost:4444/wd/hub', specs: ['spec.JS']};
Selenium address is the location where it can communicate with the selenium webdriver. Spcs tell the location of spec.JS
Now, for running the test, first navigate to the directory in which spec.JS and conf.JS are located. First thing to keep in mind that webdriver-manager should be started. If not started, you have to first start it with following command.
webdriver-manager start
Now, it’s time to run the configuration file. After starting the webdriver-manager plugin, run the config.JS file using protractor. Fire the following command.
protractor conf.JS
You have seen how many specs got passed and how many got failed.
Now let's see how the failure is going to be reflected in the console. We make the assertion false.
Modify the code in spec.JS
describe('Enter your name, function() {it('should add a Name as your name, function() {browser.get('https://angularJS.org'); element(by.model('yourName')).sendKeys(‘Name’); var name= element(by.xpath('html/body/div[2]/div[1]/div[2]/div[2]/div/h1'));expect(name.getText()).toEqual('Hello!'); });});
You will see F which means failed test case. You will get to know the complete description where the test case got failed.
Now, you must be imagining how would the reports be integrated with Jasmine. Let’s install the Jasmine reporter. Run the following command:
npm install --save-dev jasmine-reporters@^2.0.0
If you want jasmine reporter to installed globally. For installing globally, run the following command.
npm install –g jasmine-reporters@^2.0.0
You have to now modify the conf.JS. You have to add Jasmine reporter in it. Add the following code in it.
exports.config = {seleniumAddress: 'http://localhost:4444/wd/hub', capabilities: { 'browserName': ‘Chrome’ }, specs: ['spec.JS'], framework: 'jasmine2' ,onPrepare: function() { var jasmineReporters = require('C:/Users/User1/node_modules/jasmine-reporters');jasmine.getEnv().addReporter(new jasmineReporters.JUnitXmlReporter(null, true, true) ); } };
Now, run the tests using protractor conf.JS. You will see the junitresult.xml in the folder path given in conf.JS.
Open the XML file and see the result of the test case. In this way, you can take the help of protractor to test angular JS websites.
How to test the AngularJS app using Cypress?
Cypress is very close to the application. It just has a very thin layer between production code and testing code. It is Javascript E2E testing framework.
It is an open-source AngularJS Testing framework Cypress has bundled various packages such as Mocha, Chai, and Sinon. The only supportive language with Cypress is Javascript. When you open the cypress application using command cypress open, the following application will open.
This application is divided into two parts. On the left side, you write commands. There are different keywords to it. VISIT is for opening the URL and GET is for getting a webelement. CLICK is for clicking on the webelement. Using ASSERT, we can add assertions to our test cases.
For installing Cypress, you should have node.JS installed in your machine. You can then use the npm installer to add dependencies of Cypress.
npmicypress -D
Now for opening the cypress test runner, run the following command.
npx cypress open
If you want your application and Cypress to run at the same time then you have to make some changes in your package.JSon.
"cypress": "concurrently \"ng serve\" \"cypress open\""
Add these lines in package.JSon.
Now, run the following command
npm run cypress
When you add a new project in cypress then you will have below folder structure.
Fixtures have static data that has to be used by your tests. You can use them by cy.fixture() command. In the integration folder, you will have your integration tests. The plugin helps you to tweak to your test cases. Just like plugins have a file named index.JS which have a method which will run before every spec file. In Support files, you can have your reusable code.
Now, it is time to create your first test in the integration folder. You name it as test1.spec.JS. You will see it in the Cypress test runner also. Cypress API is present under the global cy project. Now let us put some code in it.
describe("Test1", () => {
it("should visit home page", () => {
cy.visit("http://localhost:4200/login");
});
});
It makes use of description and it blocks from the mocha syntax. It makes the beginning of the test cases. Once you will run this test In the test explorer, on the right side, the execution starts.
When you will run Cypress for the first time, you will see that the cypress.JSon file will get generated. In this, you can store your configuration values. Now let’s store our base URL in cypress. JSON so that we don’t have to change the URL in every test case.
{
"baseUrl":"http://localhost:4200"
}
It’s time to change the code in spec.JS also.
describe("Test1",()=>{
it("shouldvisit home page",()=>{
cy.visit("/login");
});
});
Now for getting webelement, you can make use of a cypress selector background in the test runner. It is present on the left side of the test runner. You can get the XPath from there.
Use this way to get the webelements.
cy.get('.btn-link').click();
cy.url().should('include', '/register')
This assertion will check the check has registered keywords in it. Hence, we are done with the first test case in cypress.
Conclusion
Now, we have seen different ways of AngularJS Testing. Make use o
f these and test the application in the best possible ways. Optimize your code and have the best test integration practices so that the client can be satisfied with your test metrics. All the best.
Recent Posts
- Positive Vs. Negative Testing: Examples, Difference & ImportanceApril 22nd, 2024
- What Is Statement Coverage Testing? Explained With Examples!April 13th, 2024
- 60 Important Automation Testing Interview Questions & AnswersApril 2nd, 2024
- Verification vs. Validation: Key Differences and Why They MatterMarch 19th, 2024
- What is Compatibility Testing? Example Test Cases Included!March 18th, 2024

Search Results for:
Loading...
Overview
Services
Industries


Follow us on
Contact Us
Copyright © 2026 | Digital Marketing by Jointviews